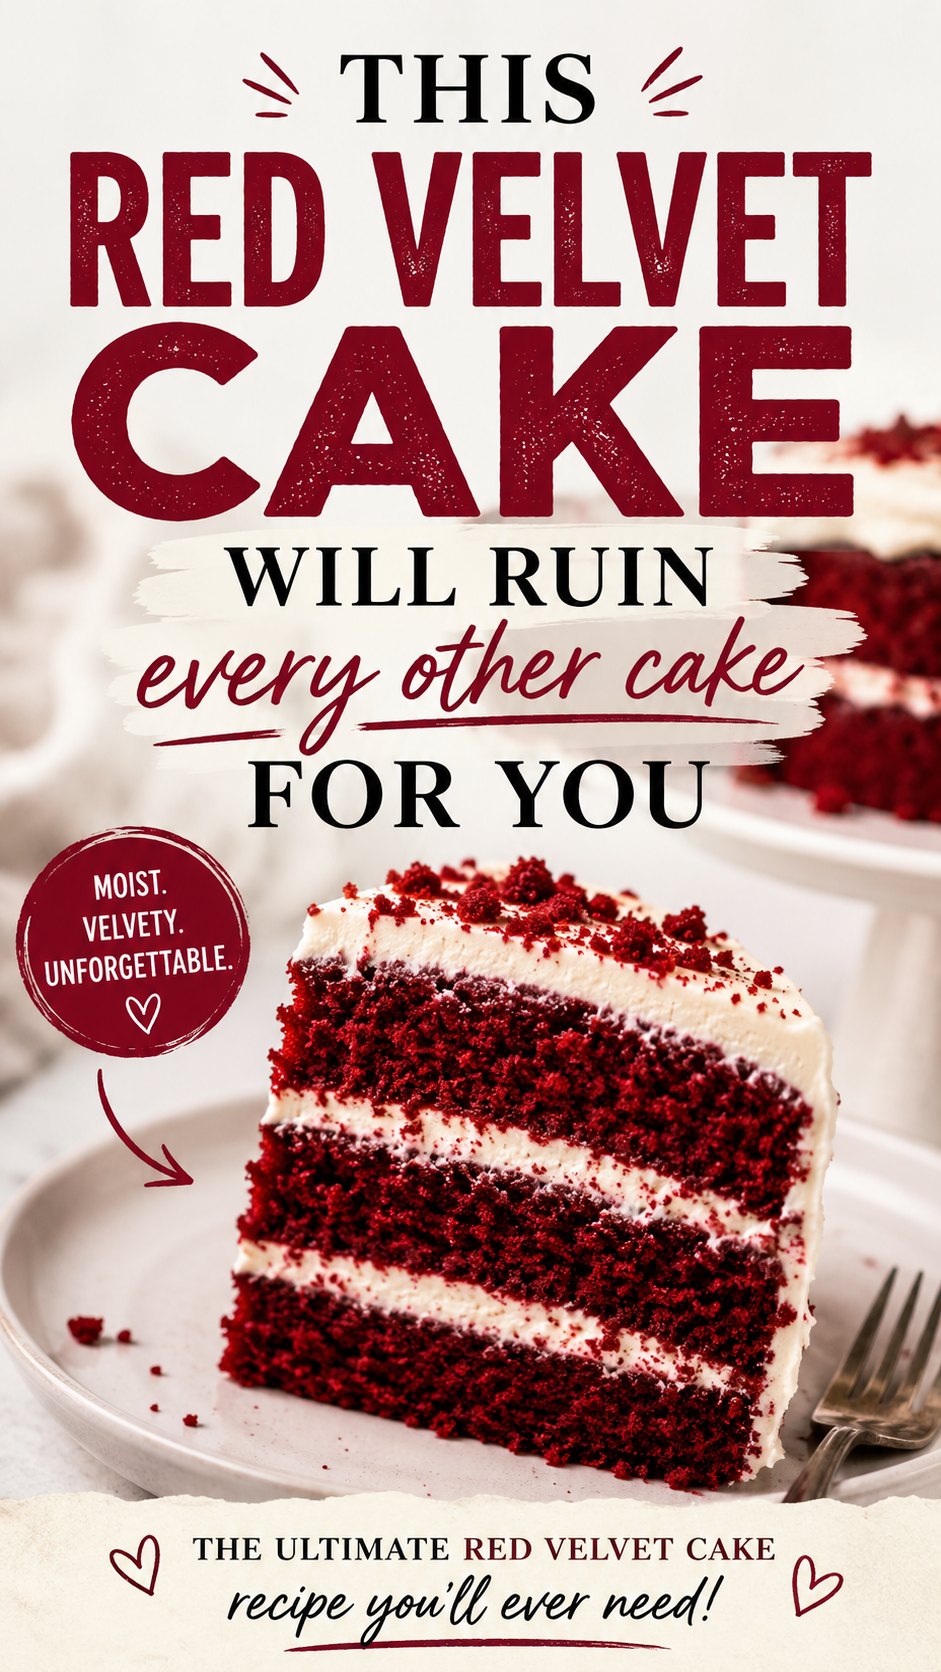
You know those recipes that sound almost too good to be true?
That’s red velvet cake. Crimson layers, cream cheese frosting that’s basically dessert on its own, and a texture so soft it almost feels like a trick.
But here’s the thing most people don’t know: red velvet isn’t just chocolate cake with food coloring. It has a genuinely distinct flavor, a tangy depth, a slight cocoa undertone, and a texture that’s uniquely its own. Once you understand that, you make it differently.
And once you make it from scratch? Every boxed cake mix will disappoint you for the rest of your life. Fair warning. 😄
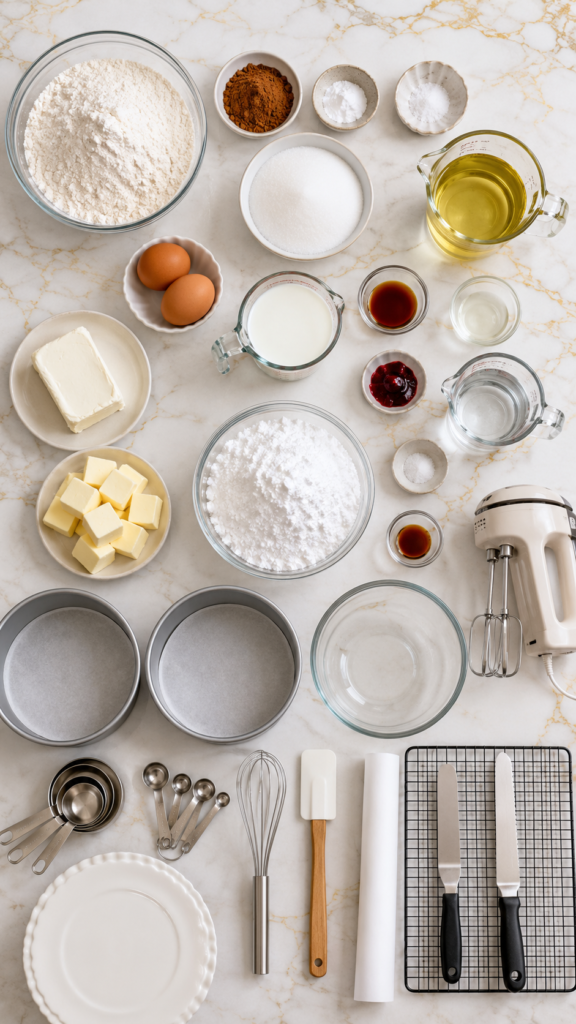
What You’ll Need
For the Cake
- 2 ½ cups (315g) all-purpose flour
- 1 ½ cups (300g) granulated white sugar
- 1 tsp baking soda
- 1 tsp fine sea salt
- 2 tsp unsweetened natural cocoa powder
- 1 cup (240ml) buttermilk, room temperature
- 2 large eggs, room temperature
- 1 ½ cups (360ml) neutral oil (vegetable or canola)
- 2 tbsp (30ml) white vinegar
- 1 tsp pure vanilla extract
- 2 tbsp (30ml) red gel food coloring (liquid works too, but gel gives a richer color)
For the Cream Cheese Frosting
- 16 oz (450g) full-fat block cream cheese, softened to room temperature
- 1 cup (230g) unsalted butter, softened to room temperature
- 4 cups (480g) powdered sugar, sifted
- 2 tsp pure vanilla extract
- Pinch of fine sea salt
Tools Required
- Two 9-inch round cake pans
- Stand mixer or hand mixer with a whisk and paddle attachment
- Large mixing bowls
- Rubber spatula
- Wire cooling racks
- Offset spatula (for frosting)
- Serrated bread knife (for leveling layers)
- Parchment paper
- Measuring cups and spoons
- Kitchen scale (highly recommended)
- Sifter or fine mesh strainer
How to Make It
Step 1: Prep Your Pans and Oven
Preheat your oven to 350°F (175°C).
Grease both 9-inch round cake pans with butter or cooking spray. Line the bottoms with parchment paper circles, then grease the parchment too. Lightly flour the sides.
This extra step is the difference between layers that release cleanly and layers that stick and break apart.
Step 2: Mix Your Dry Ingredients
In a large bowl, whisk together:
- All-purpose flour
- Sugar
- Baking soda
- Salt
- Cocoa powder
Set aside.
Step 3: Mix Your Wet Ingredients
In a separate large bowl (or your stand mixer bowl), beat the eggs lightly.
Add the oil, buttermilk, vinegar, vanilla, and red food coloring. Mix until combined. The mixture will look very red, which is exactly right.
Step 4: Combine Wet and Dry
Slowly add the dry ingredients to the wet ingredients in three additions, mixing on low speed between each addition.
Mix just until the batter comes together. Do not overmix. Overmixing develops the gluten and makes the cake dense instead of tender.
The batter will be relatively thin. That’s normal.
Step 5: Bake
Divide the batter evenly between your two prepared pans.
Bake for 28 to 32 minutes, or until a toothpick inserted into the center comes out with just a few moist crumbs (not wet batter).
Start checking at 27 minutes. Every oven runs a little differently.
Step 6: Cool Completely
Let the cakes cool in the pans for 10 minutes, then turn them out onto wire racks.
Peel off the parchment paper. Let the layers cool completely, at least 1 hour.
If the tops have domed up, level them with a serrated knife before assembling.
Step 7: Make the Cream Cheese Frosting
Beat the softened cream cheese and softened butter together on medium-high speed for 3 full minutes until fluffy and completely smooth.
Add the sifted powdered sugar in two additions, mixing on low first to avoid a sugar cloud, then increasing to medium speed.
Add vanilla and a pinch of salt. Beat for another 2 minutes until light and creamy.
Taste it. Try not to eat all of it with a spoon. (I always fail at this.)
Step 8: Assemble and Frost
Place one cake layer on your serving plate or cake board.
Spread a generous layer of frosting over the top, going all the way to the edges.
Place the second layer on top. Apply a thin “crumb coat” of frosting all over the outside of the cake. Refrigerate for 20 minutes.
Apply the final, thicker layer of frosting. Smooth it with your offset spatula or create swoops and texture however you like.
Refrigerate for at least 30 minutes before slicing.
Pro Tips
These are the things I wish someone had told me the first time I made this.
- Room temperature ingredients are non-negotiable. Cold butter or eggs in the batter will ruin the texture. Pull everything out at least an hour before you start. Seriously, set a timer.
- Use gel food coloring, not liquid. Liquid coloring can throw off the batter’s moisture balance and still give you a muted result. Gel is more concentrated, so a little goes a long way and your color will actually be red, not pink.
- Don’t skip the vinegar. It reacts with the baking soda and buttermilk to give the cake its tender, slightly bouncy crumb. It also subtly enhances the red color. You won’t taste it at all.
- Cool the layers completely before frosting. If your layers are even slightly warm, the frosting melts right off. A minimum of one hour on a wire rack, or 20 minutes in the fridge if you’re impatient (no judgment).
- Chill the frosted cake for 30 minutes before slicing. This sets everything up so you get those clean, beautiful cross-section cuts you see in every photo.
Substitutions & Variations
No buttermilk? Make your own: add 1 tablespoon of white vinegar or lemon juice to 1 cup of whole milk. Stir and let it sit for 5 minutes. Done.
Dairy-free? Swap buttermilk for full-fat oat milk + 1 tbsp apple cider vinegar. Use vegan butter and dairy-free cream cheese for the frosting. The texture shifts slightly, but it still works.
Want a richer chocolate flavor? Bump the cocoa powder up to 2 tablespoons. The cake won’t taste chocolatey, but the flavor will be deeper and more complex.
Cupcake version: Fill liners ⅔ full and bake at 350°F (175°C) for 18 to 22 minutes. Makes about 24 cupcakes.
Velvet bundt cake: Use a greased 10-cup bundt pan. Bake at 325°F (163°C) for 55 to 65 minutes. Skip the layered frosting and drizzle cream cheese glaze over the top instead.
Make-Ahead Tips
You can bake the cake layers up to 2 days in advance.
Let them cool completely, wrap each layer tightly in plastic wrap, and refrigerate. Take them out 30 minutes before assembling so they come to room temperature.
The frosting can also be made up to 3 days ahead and stored in an airtight container in the fridge. Re-whip for 1 to 2 minutes with your mixer before using.
The fully assembled cake? Make it the day before your event. It actually tastes better the next day once the flavors have had time to settle.
Nutrition Snapshot
Per slice (based on 12 slices)
| Nutrient | Amount |
|---|---|
| Calories | ~520 kcal |
| Fat | 32g |
| Saturated Fat | 12g |
| Carbohydrates | 54g |
| Sugar | 38g |
| Protein | 5g |
| Sodium | 320mg |
These numbers are approximate and will vary based on your exact ingredients and slice size.
Leftovers & Storage
At room temperature: Up to 2 hours (because of the cream cheese frosting).
In the fridge: Cover the cake loosely and store for up to 5 days. Bring slices to room temperature for 20 to 30 minutes before serving for the best flavor and texture.
In the freezer: Freeze individual slices on a baking sheet until solid, then wrap each in plastic wrap and store in a zip-lock bag. Stays good for up to 3 months. Thaw overnight in the fridge.
FAQ
Why is my red velvet cake brown instead of red?
This usually comes down to two things: using liquid food coloring instead of gel, or using Dutch-process cocoa instead of natural cocoa. Dutch-process cocoa is alkalized and reacts differently with the acids in the recipe. Stick to natural, unsweetened cocoa powder.
Can I make this without food coloring?
Yes. The cake will be a warm, brownish-red color (thanks to the cocoa and buttermilk reaction) and taste almost identical. Some people prefer it that way. It won’t look as dramatic, but it’ll taste just as good.
My frosting is too soft. What do I do?
Your butter or cream cheese was too warm. Pop the frosting in the fridge for 20 to 30 minutes, then re-whip. It should firm up.
Can I use a different frosting?
Cream cheese frosting is the classic pairing because its tanginess balances the sweetness of the cake perfectly. Ermine frosting (cooked flour-based frosting) is another traditional option and less sweet. American buttercream works but loses some of that signature flavor contrast.
Why is my cake dense?
Most likely overmixing, or the ingredients were too cold. Both prevent the cake from rising properly and developing that tender crumb. Mix just until combined, and make sure everything is at room temperature before you start.
Do I have to use oil instead of butter?
For this recipe, yes. Oil keeps the cake moist even when refrigerated. Butter-based cakes can go a bit dry and dense when chilled, which is a problem since this cake is usually served cold or at a cool room temperature.
Wrapping Up
Red velvet cake is one of those recipes that genuinely impresses people every single time.
Not because it’s complicated, it really isn’t, but because it looks stunning and tastes like something from a proper bakery. And when people find out you made it from scratch, the reaction is always worth it.
Give it a go this weekend. And when you do, drop a comment below! I’d love to know how it turned out, what variations you tried, or any questions that came up along the way. 🎂