You know that feeling when you bite into something and your first thought is “why did I ever order this from a restaurant?”
That’s chicken parmesan done right.
Crispy, golden breaded chicken. A rich, garlicky tomato sauce. Bubbling mozzarella. The kind of meal that makes everyone at the table go quiet for a full minute.
And the shocking part? It takes about 40 minutes start to finish. No culinary degree required.
Recipe at a Glance
| Detail | Info |
|---|---|
| Prep Time | 15 minutes |
| Cook Time | 25 minutes |
| Total Time | ~40 minutes |
| Servings | 4 |
| Difficulty | Easy-Medium |
| Best For | Weeknight dinners, date nights, impressing guests |
What Makes This Recipe Actually Work
Most chicken parm failures come down to one thing: soggy breading.
Either the chicken was wet before breading, the oil wasn’t hot enough, or it sat in sauce too long before serving. Every single one of those is fixable, and we’re going to fix all of them.
The other game-changer? Pounding the chicken thin. Most people skip this step and end up with a thick, unevenly cooked cutlet where the outside is overdone and the inside is questionable. One minute with a meat mallet completely changes the outcome.
Stick with me to the end, because the Pro Tips section alone is worth reading all the way through. 👇
What You’ll Need
For the Chicken
- 2 large boneless, skinless chicken breasts (about 1.5 lbs total)
- 1 cup all-purpose flour
- 2 large eggs
- 1 tablespoon water
- 1 cup Italian breadcrumbs
- ½ cup Panko breadcrumbs
- ½ cup freshly grated Parmesan cheese (divided)
- 1 teaspoon garlic powder
- 1 teaspoon onion powder
- 1 teaspoon dried Italian seasoning
- 1 teaspoon salt
- ½ teaspoon black pepper
- ½ cup vegetable oil (for frying)
For the Sauce
- 1 can (28 oz) crushed San Marzano tomatoes
- 4 cloves garlic, minced
- 2 tablespoons olive oil
- 1 teaspoon sugar
- 1 teaspoon dried basil
- 1 teaspoon dried oregano
- Salt and pepper to taste
- Fresh basil leaves (for topping)
For the Cheese Layer
- 1½ cups shredded low-moisture mozzarella cheese
- ¼ cup freshly grated Parmesan cheese
Tools You’ll Need
- Large oven-safe skillet or cast iron pan
- Shallow bowls or plates (3, for breading station)
- Meat mallet or rolling pin
- Plastic wrap or zip-lock bag (for pounding chicken)
- Tongs
- Baking sheet (optional, if finishing in oven)
- Chef’s knife and cutting board
- Box grater (for fresh Parmesan)
- Small saucepan (for the sauce)

Pro Tips
These are the things I wish someone had told me the first time I made this.
1. Dry your chicken before breading. Pat it completely dry with paper towels. Moisture is the enemy of crispy breading. Wet chicken = breading that slides off in the pan. Not cute.
2. Use a mix of Panko AND Italian breadcrumbs. Italian breadcrumbs give you flavor. Panko gives you crunch. Together, they give you that restaurant-quality crust that stays crispy even after the sauce goes on.
3. Don’t crowd the pan. Fry one or two cutlets at a time max. Too many at once drops the oil temperature and you end up steaming instead of frying. That equals soggy, and we’re not doing soggy.
4. Add the sauce and cheese at the very end. This is a critical one. Broil the breaded chicken for just 2-3 minutes with sauce and cheese on top instead of baking it long. This keeps the crust from getting soft while still melting the cheese perfectly.
5. Grate your own Parmesan. Pre-shredded Parmesan has anti-caking agents that prevent it from melting properly. Fresh from the block takes 60 seconds and makes a genuinely noticeable difference.
Substitutions and Variations
- No chicken breasts? Chicken thighs work great here. They’re juicier and harder to overcook.
- Gluten-free? Swap the flour and breadcrumbs for GF versions. The texture is slightly different but still very good.
- Want it lighter? Skip the frying and bake the breaded cutlets at 425°F for 20 minutes, flipping halfway. You won’t get the same crunch, but it’s still solid.
- Add some heat? Throw a pinch of red pepper flakes into the sauce while it simmers.
- Dairy-free? Use a dairy-free mozzarella and nutritional yeast in place of Parmesan. The sauce and breading carry so much flavor that it still comes together.
- Serve over pasta? Absolutely. Spaghetti, rigatoni, or pappardelle all work well tossed in the leftover sauce.
Make-Ahead Tips
- The sauce can be made up to 5 days ahead and stored in the fridge. It also freezes well for up to 3 months.
- The breaded, uncooked cutlets can sit in the fridge uncovered for up to 1 hour before frying. This actually helps the breading adhere better.
- Fully cooked cutlets (without sauce and cheese) can be made a day ahead. Re-crisp in a 400°F oven for 8 minutes, then add sauce and cheese to broil.
Nutritional Breakdown (Per Serving)
| Nutrient | Amount |
|---|---|
| Calories | ~620 kcal |
| Protein | ~52g |
| Carbohydrates | ~38g |
| Fat | ~28g |
| Saturated Fat | ~10g |
| Sodium | ~890mg |
| Fiber | ~3g |
Values are approximate and vary based on portion size and specific ingredients used.
Meal Pairing Suggestions:
- Simple arugula salad with lemon vinaigrette (cuts through the richness perfectly)
- Garlic bread or a crusty baguette
- Spaghetti tossed in the leftover tomato sauce
- Roasted broccolini or asparagus
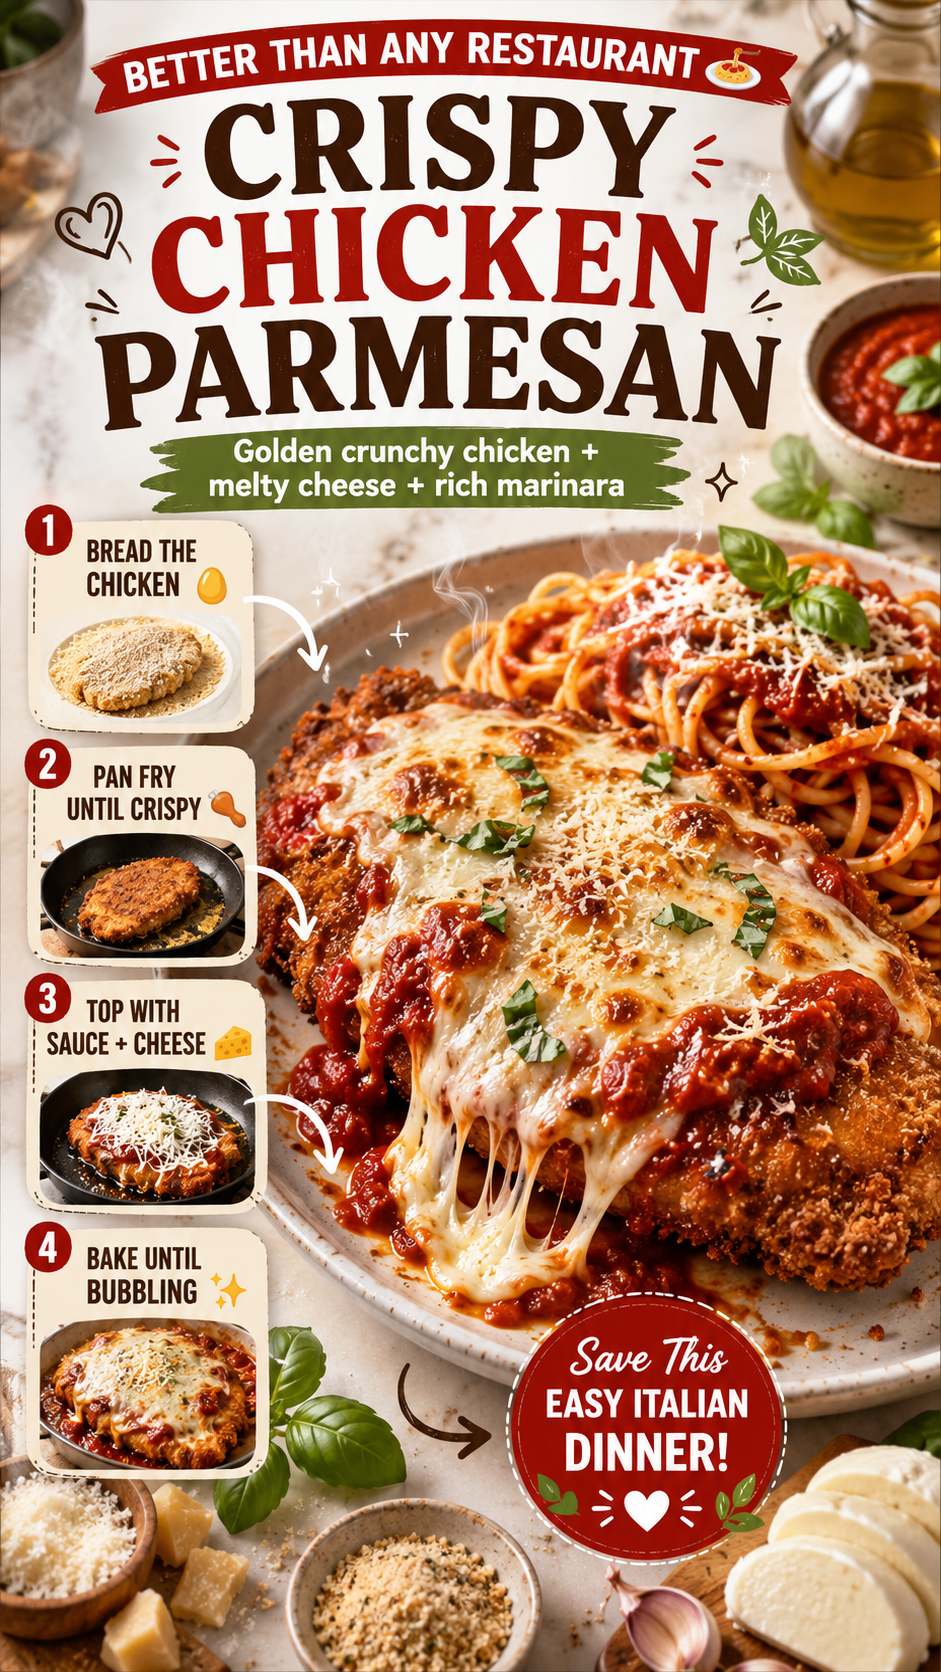
How to Make Chicken Parmesan
Step 1: Make the Sauce
- Heat olive oil in a small saucepan over medium heat.
- Add minced garlic and cook for 60 seconds until fragrant (don’t let it brown).
- Add the crushed tomatoes, sugar, basil, oregano, salt, and pepper.
- Simmer on low for 15-20 minutes, stirring occasionally.
- Taste and adjust seasoning. Set aside.
Step 2: Prep the Chicken
- Place the chicken breasts in a zip-lock bag or between two sheets of plastic wrap.
- Pound them to an even ½-inch thickness using a meat mallet or rolling pin.
- Cut each breast in half crosswise so you have 4 cutlets total.
- Pat completely dry with paper towels. Season both sides with salt and pepper.
Step 3: Set Up Your Breading Station
- Bowl 1: Flour mixed with garlic powder, onion powder, and a pinch of salt.
- Bowl 2: Eggs whisked with 1 tablespoon of water.
- Bowl 3: Italian breadcrumbs + Panko + ¼ cup of the grated Parmesan + dried Italian seasoning.
Step 4: Bread the Chicken
- Dredge each cutlet in flour, shaking off the excess.
- Dip into the egg wash, letting the excess drip off.
- Press firmly into the breadcrumb mixture on both sides, making sure it’s fully coated.
- Place breaded cutlets on a plate and let them rest for 5 minutes.
Step 5: Fry the Chicken
- Heat vegetable oil in a large oven-safe skillet over medium-high heat.
- The oil is ready when a breadcrumb sizzles immediately on contact.
- Add 2 cutlets at a time and cook 3-4 minutes per side until deep golden brown.
- Transfer to a paper towel-lined plate. Repeat with remaining cutlets.
Step 6: Add Sauce and Cheese (The Final Move)
- Preheat your broiler to high.
- Place the fried cutlets on a baking sheet (or keep them in the oven-safe skillet).
- Spoon 2-3 tablespoons of sauce onto each cutlet.
- Top with shredded mozzarella and a pinch of Parmesan.
- Broil for 2-3 minutes until the cheese is melted, bubbly, and just starting to brown at the edges.
- Top with fresh basil leaves. Serve immediately.
Leftovers and Storage
- Fridge: Store leftovers in an airtight container for up to 3 days.
- Reheating: Use the oven at 375°F for 10-12 minutes. Avoid the microwave if you want to keep any crispiness.
- Freezer: Freeze fully assembled (with sauce and cheese) for up to 2 months. Thaw overnight in the fridge and reheat in the oven.
- Pro move: Leftover chicken parm makes an incredible sandwich the next day. Slice the cutlet, put it on a hoagie roll with some extra sauce, and you’re eating better than most people’s lunches. 🥖
FAQ
Can I use store-bought marinara instead of making the sauce from scratch?
Yes, absolutely. A good quality jarred marinara works well. Look for one with San Marzano tomatoes and minimal added sugar. Rao’s is a widely loved option that’s hard to mess up.
My breading always falls off when I fry it. What am I doing wrong?
A few common culprits: the chicken was wet before breading, you skipped the flour layer, or you moved the chicken too soon in the pan. Let it cook undisturbed for the full 3-4 minutes before flipping. The breading will release naturally when it’s ready.
Can I bake instead of fry?
You can. Bake at 425°F for 20-22 minutes (flip once at the halfway point) on a wire rack set over a baking sheet. The texture won’t be quite as crispy, but it’s still genuinely good.
What’s the difference between chicken parmesan and chicken parmigiana?
Same dish, different names. “Parmigiana” is the Italian/American original. “Parmesan” or “parm” is just the everyday shorthand most people use. Either way, you’re getting the same delicious thing.
Do I have to pound the chicken?
You really don’t have to, but skipping it is a gamble. Thick, uneven chicken takes longer to cook and usually ends up dry on the outside before the inside is done. The extra minute of pounding is worth it every time.
Can I use chicken thighs?
Yes, and honestly they’re a great choice. Boneless, skinless thighs are juicier and more forgiving. Pound them to an even thickness the same way you would breasts.
Wrapping Up
If you’ve been on the fence about making chicken parm at home, this is your sign to just go for it.
It’s one of those recipes that looks impressive, tastes genuinely restaurant-worthy, and comes together faster than most people expect.
Once you try it with fresh-grated Parmesan and that broiled mozzarella that’s just slightly browned at the edges… you’ll understand why I make it on a random Tuesday just because I feel like it. 😄
Give it a go this week and drop a comment below telling me how it turned out. Questions, tweaks you made, what you served it with… I love hearing all of it.