Prep: 15 min Marinate: 1–4 hrs Cook: 20 min Total: ~2 hrs Servings: 4 Difficulty: Easy
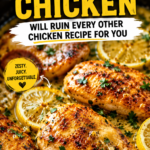
Golden, shatteringly crispy on the outside. Juicy, tender, never dry on the inside. This is the one.
I’ll be real with you: I spent years ordering takeout fried chicken because I was convinced making it at home was too complicated, too messy, or just… not as good.
I was so wrong. This crispy chicken recipe changed the entire game for me. One batch and I genuinely questioned every takeout order I had ever placed. The crust is that good.
And here’s the thing most recipes don’t tell you: the crunch doesn’t come from one secret ingredient. It comes from a specific technique. A double-dredge, a buttermilk soak, and the right oil temperature — and suddenly you’re producing chicken that sounds like it literally shatters when you bite into it. 🍗
I’m going to walk you through every single step, including the parts that most recipes gloss over (like why your oil temperature is everything).
Recipe at a Glance
| Detail | Info |
|---|---|
| Cuisine | American / Southern-style |
| Main Protein | Bone-in, skin-on chicken pieces |
| Cooking Method | Pan-fry / shallow fry |
| Prep Time | 15 minutes |
| Marinating Time | 1–4 hours (overnight for best results) |
| Cook Time | 18–22 minutes |
| Servings | 4 people |
| Calories (approx.) | 520 kcal per serving |
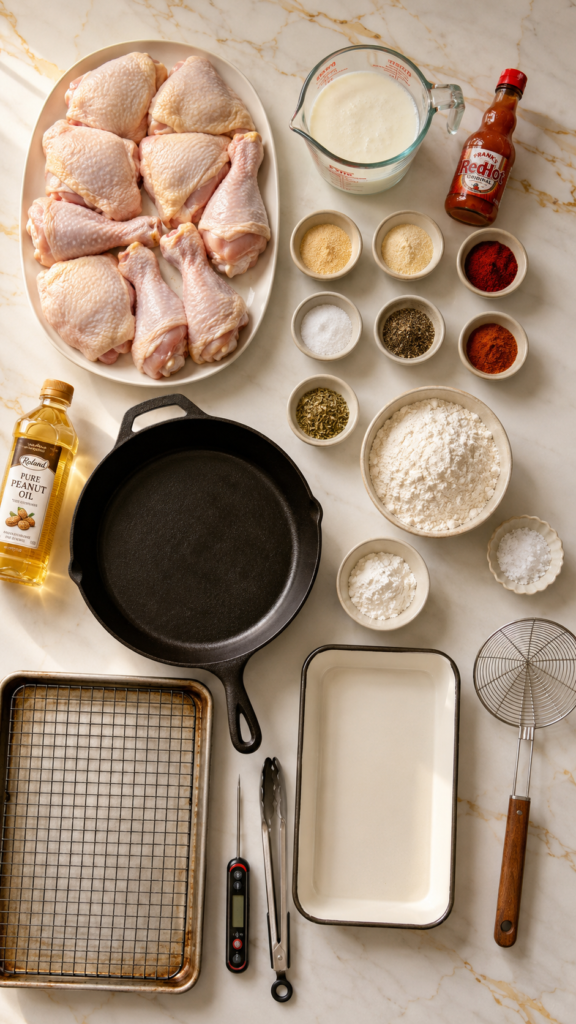
What You’ll Need
For the Buttermilk Marinade
2 lbs bone-in, skin-on chicken pieces (thighs + drumsticks)
1 cup buttermilk
1 tsp hot sauce (Tabasco or Frank’s)
1 tsp garlic powder
1 tsp onion powder
1 tsp smoked paprika
1 tsp fine sea salt
½ tsp black pepper
For the Dredge (the Crispy Coating)
1½ cups all-purpose flour
½ cup cornstarch
1½ tsp smoked paprika
1 tsp garlic powder
1 tsp onion powder
1 tsp fine sea salt
½ tsp cayenne pepper
½ tsp black pepper
½ tsp dried oregano
For Frying
3–4 cups peanut oil (or vegetable oil)
Flaky sea salt for finishing
Tools Required
- Large cast iron skillet or heavy-bottomed pot — holds heat evenly, which is non-negotiable for frying
- Instant-read thermometer — two uses: oil temp and checking the chicken is cooked through
- Wire rack set over a baking sheet — for draining (never paper towels — more on that in the pro tips)
- Large zip-lock bag or bowl with lid — for the buttermilk marinade
- Shallow dish or tray — for the dredging flour
- Tongs — for turning without dropping temperature
- Spider strainer or slotted spoon — for safely removing pieces
Pro Tips
Pro Tip 01
Add cornstarch to your flour. This is the single biggest upgrade most home cooks skip. Cornstarch doesn’t absorb moisture the way flour does, so it creates a lighter, crunchier coating that stays crisp way longer. Aim for a 3:1 ratio of flour to cornstarch.
Pro Tip 02
Wire rack, not paper towels. Resting fried chicken on paper towels traps steam underneath, which turns that gorgeous crust soggy within minutes. A wire rack lets air circulate on all sides. Trust the rack.
Pro Tip 03
Oil temperature is everything. Too low and the chicken absorbs oil and goes greasy. Too high and the outside burns before the inside is cooked. The sweet spot is 325–350°F (163–177°C). Don’t eyeball it — get a thermometer.
Pro Tip 04
Don’t skip the double dredge. After the first coat of flour, dip the chicken back into the buttermilk (just a quick dunk), then into the flour again. This builds layers and creates those gorgeous craggy bits that crunch like crazy.
Pro Tip 05
Let the coated chicken rest before frying. After dredging, set the pieces on a rack for 10–15 minutes. The coating hydrates and adheres better, meaning it won’t slide off in the oil.
Substitutions and Variations
| Ingredient | Swap | Notes |
|---|---|---|
| Buttermilk | Whole milk + 1 tbsp lemon juice or vinegar | Let it sit 5 min to curdle |
| All-purpose flour | Gluten-free flour blend | Works well, texture slightly different |
| Peanut oil | Vegetable oil, canola, or shortening | Avoid olive oil — smoke point too low |
| Cayenne | Chili powder or leave out | Adjust to your heat preference |
| Bone-in chicken | Chicken tenders or boneless thighs | Reduce cook time to 10–12 minutes |
| Pan-fry | Air fryer at 400°F for 20 min | Spray with oil; flip halfway — still really crispy |
Want a spicy kick? Double the cayenne and add ½ tsp chili flakes to the dredge.
Dairy-free? Use unsweetened oat milk with a splash of apple cider vinegar. It works surprisingly well.
Make-Ahead Tips
- Marinate overnight. The longer the chicken soaks in buttermilk, the more tender the meat gets. Up to 24 hours in the fridge is perfect.
- Dredge ahead of time. You can coat the chicken and refrigerate it (uncovered on a rack) for up to 2 hours before frying. The coating sets up even better.
- Keep it warm in the oven. If you’re frying in batches, keep finished pieces warm at 200°F in the oven on a rack while you finish the rest.
How to Make Crispy Chicken
Step-by-Step Instructions
- Make the marinade.In a large bowl or zip-lock bag, combine the buttermilk, hot sauce, garlic powder, onion powder, smoked paprika, salt, and black pepper. Add the chicken pieces and toss to coat completely. Seal and refrigerate for at least 1 hour — 4 hours is better, overnight is best.
- Mix the dredge.In a shallow dish or tray, whisk together the flour, cornstarch, smoked paprika, garlic powder, onion powder, salt, cayenne, black pepper, and dried oregano until evenly combined.
- Dredge the chicken (double coat it).Remove a piece of chicken from the marinade, letting any excess drip off. Press it firmly into the flour mixture, coating every surface. Dip it briefly back into the buttermilk left in the bag, then press into the flour again. Set on a wire rack. Repeat with all pieces. Rest for 10–15 minutes.
- Heat the oil.Pour 2–3 inches of oil into a cast iron skillet or heavy pot. Heat over medium-high until the thermometer reads 340°F (171°C). Adjust heat as needed to maintain temperature throughout frying.
- Fry the chicken.Working in batches (don’t overcrowd — this drops the temperature dramatically), carefully lower the chicken into the oil using tongs. Fry for 10–12 minutes on the first side, until deeply golden brown. Flip and fry another 8–10 minutes. Internal temperature should reach 165°F (74°C).
- Drain and rest.Transfer to a clean wire rack over a baking sheet. Immediately sprinkle with a pinch of flaky sea salt while still hot. Let it rest for at least 5 minutes before serving.
🌡️ Quick Temp Check: If you don’t have a thermometer, test the oil by dropping a pinch of flour in — if it sizzles and floats immediately, you’re in the right zone. But honestly, just get a thermometer. It’s a $12 investment that changes everything.
Nutrition Breakdown
Approximate per serving (2 pieces, thigh + drumstick, without sides):
| Nutrient | Amount | Notes |
|---|---|---|
| Calories | ~520 kcal | Varies with oil absorption |
| Protein | 38g | High — great post-workout meal |
| Total Fat | 28g | Mostly from skin and frying oil |
| Carbohydrates | 32g | From the flour dredge |
| Sodium | 680mg | Reduce by cutting salt in dredge |
| Fiber | 1g |
Lower calorie option: Air fry instead of pan-fry. You’ll save roughly 100–120 calories per serving and still get a genuinely crispy result.
What to Serve It With
This chicken is good enough to eat on its own. But if you want a full spread:
- Classic coleslaw — the cool creaminess is a perfect contrast to the hot crunch
- Buttermilk biscuits — obviously
- Honey drizzled over the top — sounds odd, tastes incredible
- Mac and cheese for a full comfort food moment
- Pickled jalapeños or dill pickles on the side — cuts through the richness perfectly
- Serve with hot honey sauce for a Nashville-style situation that’s genuinely addictive
Leftovers and Storage
- Fridge: Store in an airtight container for up to 3 days. Place on a wire rack inside the container if you can — keeps the bottom from going soggy.
- Reheating (and keeping the crunch!): The oven is your best friend here. 375°F for 12–15 minutes on a wire rack. The crust comes back to life. Avoid the microwave — it will destroy the crunch instantly.
- Freezer: Freeze fully cooled chicken pieces in a single layer on a baking sheet first, then transfer to a zip-lock bag for up to 2 months. Reheat from frozen at 375°F for 20–25 minutes.
- Leftover idea: Chop it up and put it in a chicken sandwich with pickles and hot sauce on a brioche bun. You’re welcome.
Frequently Asked Questions
Why isn’t my chicken crust staying on?
Two reasons this usually happens: you didn’t press the coating firmly enough, or you skipped the resting period after dredging. Letting the coated chicken sit on a rack for 10–15 minutes before frying gives the flour time to adhere. Also make sure your oil is hot enough — cold oil causes the coating to slide off.
Can I make this without buttermilk?
Yes. Add 1 tablespoon of lemon juice or white vinegar to 1 cup of whole milk, stir, and let it sit for 5 minutes. It curdles slightly and mimics buttermilk well enough to get great results.
My chicken is golden outside but raw inside. What happened?
Your oil was too hot. When the oil temperature is too high, the outside browns before the inside has time to cook through. Lower the temp to 325–340°F and fry longer. This is exactly why the thermometer matters so much.
Can I use boneless chicken breasts?
You can, but thighs and drumsticks are more forgiving. Breasts dry out quickly and can overcook before the crust is where you want it. If using breasts, pound them to even thickness and reduce frying time to about 8–10 minutes total.
What oil is best for frying chicken?
Peanut oil is the gold standard — it has a high smoke point (around 450°F) and a neutral flavor. Vegetable oil and canola are great alternatives. Avoid olive oil, coconut oil, or anything with a low smoke point.
How do I know the chicken is fully cooked?
Use a meat thermometer and check the thickest part of the piece without touching bone. It needs to reach 165°F (74°C). Never guess on this one.
Wrapping Up
There’s nothing complicated about this recipe. It’s just technique done right — a good soak, a proper dredge, the right oil temp, and a wire rack to finish. That’s it.
Once you make this, takeout fried chicken is going to feel like a real downgrade. And the good news? The leftovers are somehow just as good reheated in the oven the next day.
Made this recipe? Leave a comment below and tell me how it turned out — or ask any questions you’ve got. I read every single one! 🍗