And I mean that in the best possible way.
There’s a moment when your kitchen fills with the smell of cinnamon, butter, and caramelized apples, and you just know you’re making something people will remember.
That moment is this pie.
I’ve tested a lot of apple pie recipes. Most were fine. A few were forgettable. This one? It’s the kind of pie that makes someone go quiet after the first bite, then slowly look up and ask, “Can I have another slice?” 😌
Stick around — I’m also going to share the one thing most recipes skip that makes the filling actually thick and saucy instead of watery.
Recipe At a Glance
| Detail | Info |
|---|---|
| Prep Time | 45 minutes |
| Chill Time | 1 hour (crust) |
| Cook Time | 55–65 minutes |
| Total Time | ~2.5 hours |
| Servings | 8 slices |
| Difficulty | Intermediate |
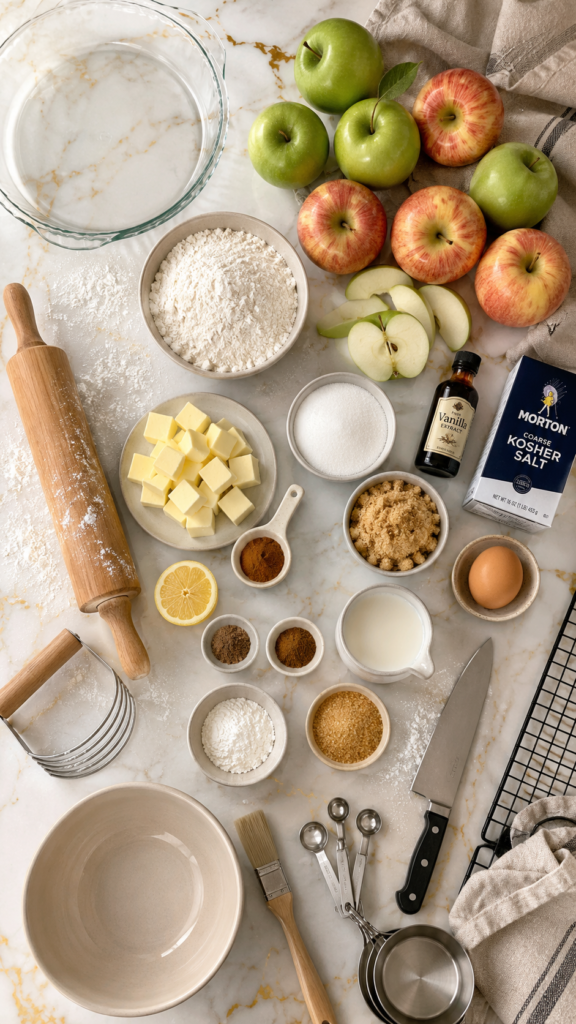
What You’ll Need
For the Pie Crust (Double Crust)
- 2 ½ cups (315g) all-purpose flour
- 1 tbsp granulated sugar
- 1 tsp salt
- 1 cup (226g) unsalted butter, very cold, cubed
- 6–8 tbsp ice water
For the Apple Filling
- 3 lbs (about 6–7 medium) apples — Granny Smith + Honeycrisp mix recommended
- ¾ cup (150g) granulated sugar
- ¼ cup (50g) light brown sugar, packed
- 1 tsp ground cinnamon
- ¼ tsp ground nutmeg
- ¼ tsp ground allspice
- ¼ tsp salt
- 3 tbsp cornstarch
- 1 tbsp fresh lemon juice
- 1 tsp vanilla extract
- 2 tbsp unsalted butter, cut into small pieces
For the Egg Wash
- 1 large egg
- 1 tbsp milk or cream
- 1–2 tbsp coarse or turbinado sugar (for topping)
Tools You’ll Need
- 9-inch pie dish
- Large mixing bowl
- Pastry cutter or food processor
- Rolling pin
- Sharp knife or apple peeler
- Measuring cups and spoons
- Pastry brush
- Aluminum foil or pie shield
- Cooling rack
Pro Tips
These are the things I wish someone had told me before I made my first pie.
1. Cold butter = flaky crust. This is non-negotiable. Cut your butter into cubes and pop them in the freezer for 15 minutes before starting. Warm butter melts into the flour and gives you a sad, dense crust instead of those gorgeous flaky layers.
2. Mix two apple varieties. Using only one type of apple is a common mistake. Granny Smith holds its shape and adds tartness. Honeycrisp melts slightly and adds sweetness. Together, the texture and flavor are so much better than going with just one.
3. Pre-cook the apples to avoid the gap. You’ve probably cut into an apple pie and found a huge empty space between the filling and the top crust. It happens because apples shrink as they bake. Toss your apples in the sugar mixture and let them sit for 30 minutes — they’ll release their juices first and you can cook that liquid down. No more gap.
4. Don’t skip the cornstarch. It thickens the filling beautifully. Flour works in a pinch, but cornstarch gives you that glossy, jammy sauce that makes the filling look and taste like a bakery made it.
5. Tent with foil at the halfway mark. If the crust is browning too fast on top but the filling isn’t done, loosely tent a piece of foil over it. Saves the crust every time.
How to Make It
Step 1: Make the Pie Dough
In a large bowl, whisk together the flour, sugar, and salt.
Add the cold cubed butter. Using a pastry cutter (or your fingertips), work the butter into the flour until you get pea-sized clumps. Some larger pieces are totally fine — those create flakiness.
Drizzle in ice water one tablespoon at a time, mixing gently with a fork after each addition. Stop when the dough just comes together and holds its shape when you pinch it. You may not need all 8 tablespoons.
Divide the dough in half, flatten each into a disc, wrap in plastic wrap, and refrigerate for at least 1 hour (up to 3 days).
Step 2: Prep the Apples
Peel, core, and slice the apples about ¼ inch thick. Even slices = even cooking.
In a large bowl, toss the apples with both sugars, cinnamon, nutmeg, allspice, salt, lemon juice, and vanilla. Let this sit for 30 minutes. The apples will release a lot of liquid — that’s exactly what you want.
Drain the liquid into a small saucepan. Cook it over medium heat for about 8–10 minutes until it thickens and reduces to roughly 3–4 tablespoons. Pour it back over the apples.
Sprinkle in the cornstarch and toss well to coat.
Step 3: Roll Out the Dough
Preheat your oven to 400°F (205°C).
On a lightly floured surface, roll one disc of dough into a 12-inch circle. Gently fold it in half, transfer it to your pie dish, then unfold it. Press it lightly into the dish without stretching. Trim any excess, leaving about a 1-inch overhang.
Roll the second disc into another 12-inch circle for the top.
Step 4: Fill & Top
Pour the apple filling into the crust and distribute evenly. Dot the top of the filling with the small pieces of butter.
Lay the second dough circle on top. Fold the edges of the top crust under the bottom crust edge and crimp to seal — press with a fork or pinch with your fingers.
Cut 4–5 small slits in the top crust so steam can escape. This also prevents the top from puffing up weirdly in the oven.
Brush the top crust with the egg wash (egg + milk, whisked together). Sprinkle generously with coarse sugar.
Step 5: Bake
Place the pie on a baking sheet (to catch any drips).
Bake at 400°F for 20 minutes, then reduce the temperature to 375°F (190°C) and bake for another 35–45 minutes. The crust should be deeply golden and you should see the filling bubbling through the slits.
If the edges are browning too quickly, cover them with foil or a pie shield.
Let the pie cool on a wire rack for at least 2 hours before slicing. I know. I know. But this step is what lets the filling set properly — cutting in too early means a runny mess.
Substitutions & Variations
Different apples: Braeburn, Pink Lady, or Fuji all work well. Just avoid Red Delicious — they get mushy and watery.
Brown sugar all the way: Swap all granulated sugar for brown sugar in the filling for a deeper, more caramel-like flavor.
Spiced up: Add a pinch of cardamom or ground cloves to the filling spice mix for a more complex, warming flavor.
Lattice top: Instead of a full top crust, cut the dough into strips and weave a lattice. It looks impressive and lets you see the filling bubble.
Gluten-free crust: Swap the all-purpose flour for a 1:1 gluten-free baking flour. The texture will be a little more crumbly but still very tasty.
Dairy-free: Use vegan butter (the stick kind, not spreadable) in the crust and coconut oil in place of the butter dotted over the filling.
Make-Ahead Tips
The pie dough can be made up to 3 days ahead and refrigerated, or frozen for up to 3 months. Thaw overnight in the fridge before rolling.
The apple filling can also be prepped a day in advance and stored in the fridge.
You can even assemble the whole unbaked pie, wrap it tightly, and freeze it for up to 2 months. Bake straight from frozen — add about 15–20 minutes to the bake time.
Nutritional Info (Per Slice, 1 of 8)
| Nutrient | Amount |
|---|---|
| Calories | ~420 kcal |
| Carbohydrates | ~62g |
| Fat | ~18g |
| Saturated Fat | ~11g |
| Protein | ~4g |
| Sugar | ~34g |
| Fiber | ~3g |
These are estimates and will vary depending on apple variety and exact measurements.
Diet Swaps
- Vegan: Use vegan butter + plant-based milk for egg wash
- Lower sugar: Reduce sugar in filling to ½ cup + use a naturally sweet apple like Fuji
- Gluten-free: Use 1:1 GF flour blend for the crust
Meal Pairing Suggestions
Apple pie honestly doesn’t need much help, but if you want to turn it into a full moment:
- Vanilla bean ice cream — the classic for a reason
- Sharp cheddar cheese — sounds wild, tastes incredible (it’s a New England thing)
- Salted caramel drizzle — homemade or store-bought, no judgment
- Freshly whipped cream — simple and perfect
Leftovers & Storage
Room temperature: Cover loosely and store for up to 2 days.
Refrigerator: Wrap well and refrigerate for up to 5 days.
Freezer: Freeze individual slices (wrapped in plastic + foil) for up to 3 months. Thaw at room temperature or warm in the oven at 350°F for about 15 minutes.
Pro reheating move: 10 minutes in a 350°F oven brings the crust back to life way better than the microwave, which makes it soggy.
FAQ
Can I use store-bought pie crust?
Absolutely. The homemade crust takes this to another level, but store-bought works fine when you’re short on time. Refrigerated rolled crusts (not the frozen kind in the tin) taste the closest to homemade.
My filling is too runny. What happened?
Two likely culprits: you didn’t reduce the apple liquid before adding the cornstarch, or you cut into the pie before it fully cooled. Give it the full 2 hours. If it’s still runny next time, add an extra tablespoon of cornstarch.
My crust is shrinking. How do I stop that?
Don’t stretch the dough when you’re pressing it into the pie dish — let it fall in naturally. Also make sure it’s chilled enough before baking.
Can I use a deep-dish pie pan?
Yes, but you’ll need to scale up the filling slightly (add 1–2 more apples and increase the spices and sugar by about 20%).
Do I have to peel the apples?
You don’t have to, but the skins can separate from the flesh as they bake and end up with a slightly tough, papery texture in the filling. Most people prefer peeled.
What if I don’t have a pastry cutter?
Use two forks, or just use your fingertips and work quickly so the butter stays cold.
Wrapping Up
Apple pie has this reputation for being hard, but it really isn’t once you know the moves.
The flaky crust, the jammy filling, the crispy sugar top — once you pull this out of the oven and let it cool, you’ll get it. You’ll understand why people have been making this for generations.
Give it a go this weekend and let me know how it turns out! Drop your questions or comments below — and if you tried a fun variation (like adding cranberries or caramel), I genuinely want to hear about it. 🥧