You know that moment when you cut into a dessert and everyone goes silent? That’s exactly what this Red Velvet Oreo Cheesecake does.
It’s bold. It’s rich. And it looks like it came straight out of a fancy bakery, except you made it in your own kitchen.
Spoiler: It’s easier than it looks. And once people find out you made this from scratch? You’ll be the most popular person at every dinner party for the rest of your life.
Recipe at a Glance
| Detail | Info |
|---|---|
| Prep Time | 30 minutes |
| Chill Time | 6 hours (or overnight) |
| Total Time | 6 hours 30 minutes |
| Servings | 12 slices |
| Difficulty | Medium |
| Best For | Celebrations, dinner parties, holidays |
What Makes This Cheesecake Different
Most cheesecakes are good. This one is unforgettable.
You’ve got a crushed Oreo crust that’s buttery, slightly salty, and holds together perfectly. Then there’s the red velvet cheesecake layer, which is velvety, tangy, and deeply chocolatey. And on top? A cloud of cream cheese whipped topping with Oreo crumbles.
Three layers. One pan. Zero complaints.
Fun fact: Red velvet cake gets its signature crimson color from a chemical reaction between natural cocoa powder and acidic ingredients like buttermilk and vinegar. Food coloring just amplifies it.
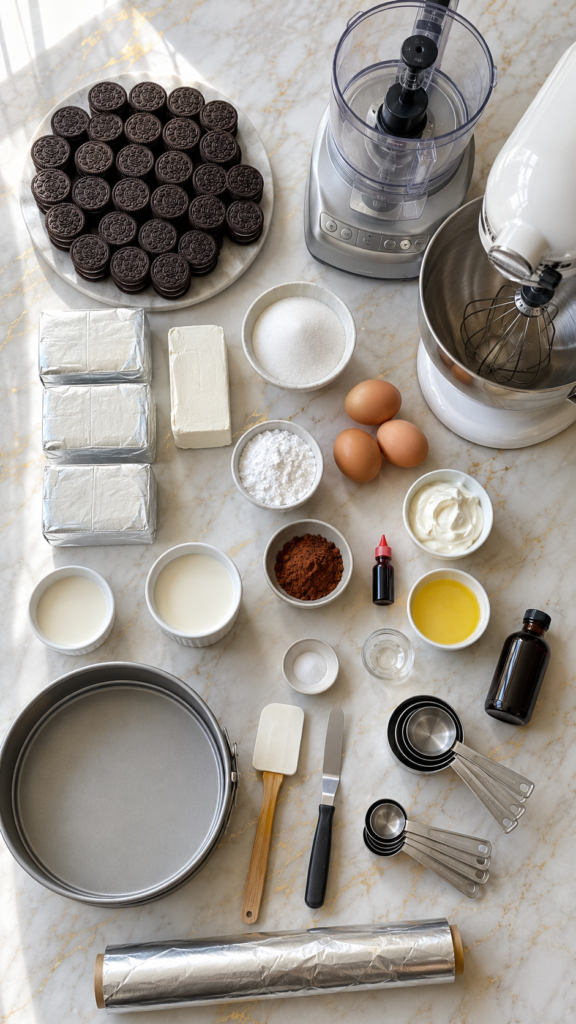
What You’ll Need
For the Oreo Crust
- 36 Oreo cookies (the whole cookie, cream and all)
- 5 tablespoons unsalted butter, melted
- Pinch of salt
For the Red Velvet Cheesecake Filling
- 3 packages (8 oz each) full-fat cream cheese, softened to room temperature
- 1 cup granulated sugar
- 3 large eggs, room temperature
- 1/2 cup sour cream, room temperature
- 1/2 cup heavy whipping cream
- 2 tablespoons unsweetened natural cocoa powder
- 1 tablespoon red food coloring (gel preferred)
- 1 teaspoon pure vanilla extract
- 1 teaspoon white vinegar
- 1/4 teaspoon salt
For the Cream Cheese Topping
- 8 oz full-fat cream cheese, softened
- 1/2 cup powdered sugar, sifted
- 1 teaspoon pure vanilla extract
- 1 cup heavy whipping cream, cold
- 12 Oreo cookies, roughly chopped (for garnish)
Tools You’ll Need
- 9-inch springform pan
- Food processor or zip-lock bag + rolling pin
- Stand mixer or hand mixer
- Large mixing bowl
- Rubber spatula
- Measuring cups and spoons
- Kitchen scale (optional but recommended)
- Roasting pan (for the water bath)
- Aluminum foil
- Offset spatula
- Cooling rack
Pro Tips
These are the things no one tells you until after you’ve already made a mistake.
1. Room temperature everything. Cold cream cheese = lumpy batter. Cold eggs = a dense, uneven texture. Pull everything out of the fridge at least an hour before you start.
2. Don’t skip the water bath. A water bath (bain-marie) creates steam in the oven, keeping the cheesecake moist and preventing those dreaded cracks. Wrap the outside of your pan tightly in two layers of heavy-duty foil before placing it in water.
3. Don’t over-mix after adding the eggs. Over-mixing incorporates too much air, which causes the cheesecake to puff up and then crack when it cools. Once you add the eggs, mix on low speed just until combined.
4. Let it cool slowly. When the cheesecake is done, turn off the oven, crack the door open, and let it sit in there for an hour. This slow cool prevents a sudden temperature drop, which is what causes sinking and cracking.
5. Chill it overnight if you can. Six hours is the minimum, but overnight is where the texture really comes together. It firms up beautifully and the flavors deepen.
Substitutions and Variations
No need to run to a specialty store if you’re missing something.
- No red food coloring? Use beet powder for a natural alternative. Start with 2 tablespoons and adjust for color.
- Dairy-free? Swap full-fat cream cheese for a plant-based version like Violife or Kite Hill. Use coconut cream in place of heavy whipping cream.
- No sour cream? Full-fat Greek yogurt works perfectly as a 1:1 swap.
- Want a deeper chocolate flavor? Add an extra tablespoon of cocoa powder.
- Oreo alternatives: Golden Oreos, Chocolate Wafers, or even Biscoff cookies work great for the crust.
Make-Ahead Tips
This cheesecake is a dream for meal preppers and party planners.
- Make it 2 days ahead. It actually tastes better the next day. Just cover it tightly with plastic wrap and refrigerate.
- Freeze for up to 3 months. Wrap individual slices in plastic wrap, then foil. Thaw overnight in the fridge before serving. Add the whipped topping fresh after thawing.
- Make the crust ahead. You can press the crust into the pan and refrigerate it uncovered for up to 24 hours before filling.
How to Make It: Step-by-Step
Step 1: Make the Oreo Crust
Preheat your oven to 325°F (163°C).
Blitz the Oreos in a food processor until you get fine crumbs. No food processor? Put them in a zip-lock bag and smash them with a rolling pin. Works just as well.
Add the melted butter and a pinch of salt. Pulse until it looks like wet sand.
Press the mixture firmly and evenly into the bottom of your springform pan, going about 1 inch up the sides. Use the bottom of a measuring cup to really pack it in.
Bake for 10 minutes, then set aside to cool.
Step 2: Make the Red Velvet Filling
Beat the softened cream cheese with an electric mixer on medium speed until completely smooth, about 2 minutes. Scrape down the sides constantly.
Add the sugar and mix until combined.
Add the sour cream, heavy cream, cocoa powder, red food coloring, vanilla, vinegar, and salt. Mix on low until smooth.
Add the eggs one at a time, mixing on low speed just until each egg disappears into the batter. Do not overmix.
Step 3: Bake in a Water Bath
Wrap the bottom of your springform pan in two layers of heavy-duty aluminum foil.
Pour the filling over the cooled crust. Smooth the top with a spatula.
Place the wrapped pan in a large roasting pan. Fill the roasting pan with about 1 inch of hot water.
Bake at 325°F for 55-65 minutes. The edges should be set but the center should still have a slight jiggle, like Jell-O, not like liquid.
Step 4: Cool It Down
Turn off the oven. Crack the door open about an inch. Let the cheesecake sit in the oven for 1 hour.
Remove it from the water bath, discard the foil, and let it cool completely on a wire rack (about 1 more hour).
Run a thin knife or offset spatula around the edge to release it from the pan. Cover with plastic wrap and refrigerate for at least 6 hours, preferably overnight.
Step 5: Make the Cream Cheese Topping
Beat the softened cream cheese until fluffy.
Add the powdered sugar and vanilla. Mix until smooth.
In a separate bowl, whip the cold heavy cream until stiff peaks form.
Fold the whipped cream into the cream cheese mixture gently until combined.
Spread or pipe onto the chilled cheesecake. Top with roughly chopped Oreos.
Nutritional Info (Per Slice, Approximate)
| Nutrient | Amount |
|---|---|
| Calories | ~520 kcal |
| Total Fat | 35g |
| Saturated Fat | 19g |
| Carbohydrates | 44g |
| Sugar | 31g |
| Protein | 7g |
Calculations are approximate and based on 12 servings.
Meal Pairing Suggestions
- Serve with a scoop of vanilla bean ice cream for extra indulgence.
- Pair with a hot cup of dark roast coffee or a mocha latte. The bitterness balances the sweetness perfectly.
- A glass of cold milk is the classic move, and honestly, it never disappoints.
Leftovers and Storage
In the fridge: Covered tightly with plastic wrap or in an airtight container, this cheesecake keeps for up to 5 days. It honestly tastes better on day 2 or 3.
In the freezer: Freeze individual slices wrapped in plastic wrap + foil for up to 3 months. Thaw in the fridge overnight before eating.
Important: Add the Oreo topping and garnishes right before serving if you want them to stay crisp. Once mixed into the cream, they’ll soften over time (still delicious, just less crunchy).
FAQ
Why did my cheesecake crack?
The most common culprits are over-mixing after adding eggs, skipping the water bath, or cooling it too quickly. Follow the tips in this recipe and cracking is very unlikely.
Can I make this without a springform pan?
Technically yes, but it’ll be much harder to remove and serve neatly. A springform pan is worth the investment if you bake cheesecakes even occasionally.
Do I have to use a water bath?
No, but you’re increasing your risk of cracks and a drier texture. It’s an extra 5 minutes of effort and makes a noticeable difference.
My cheesecake is still jiggly in the middle. Is it done?
A slight jiggle in the center (think Jell-O) is normal and correct. It firms up as it chills. If the whole thing is sloshing around, give it more time.
Can I use low-fat cream cheese?
You can, but the texture won’t be as rich and creamy. Full-fat is strongly recommended for the best result.
Why is my cream cheese lumpy in the batter?
It wasn’t soft enough. Room temperature cream cheese is non-negotiable for a smooth batter. Leave it out for at least an hour before starting.
Can I skip the food coloring?
Yes. You’ll get more of a chocolatey brown cheesecake than red velvet, but it’ll taste exactly the same.
Wrapping Up
If you’ve been scrolling past fancy cheesecake recipes thinking they’re too complicated or too risky, this one is your sign to just go for it.
The Oreo crust. The deep red filling. The pillowy cream cheese topping. It’s everything you want in a dessert, and it comes together in steps anyone can follow.
Now it’s your turn. Make it this weekend, bring it to your next gathering, or honestly just make it for yourself on a Tuesday. You deserve it.
And when you do, drop a comment below. Tell me how it went, what you changed, what everyone said when they saw it. I genuinely love hearing how recipes turn out in real kitchens.
Questions? Ask away down below. 👇