You know that moment when you take one bite of something and your brain just goes, “wait.”
That’s this recipe.
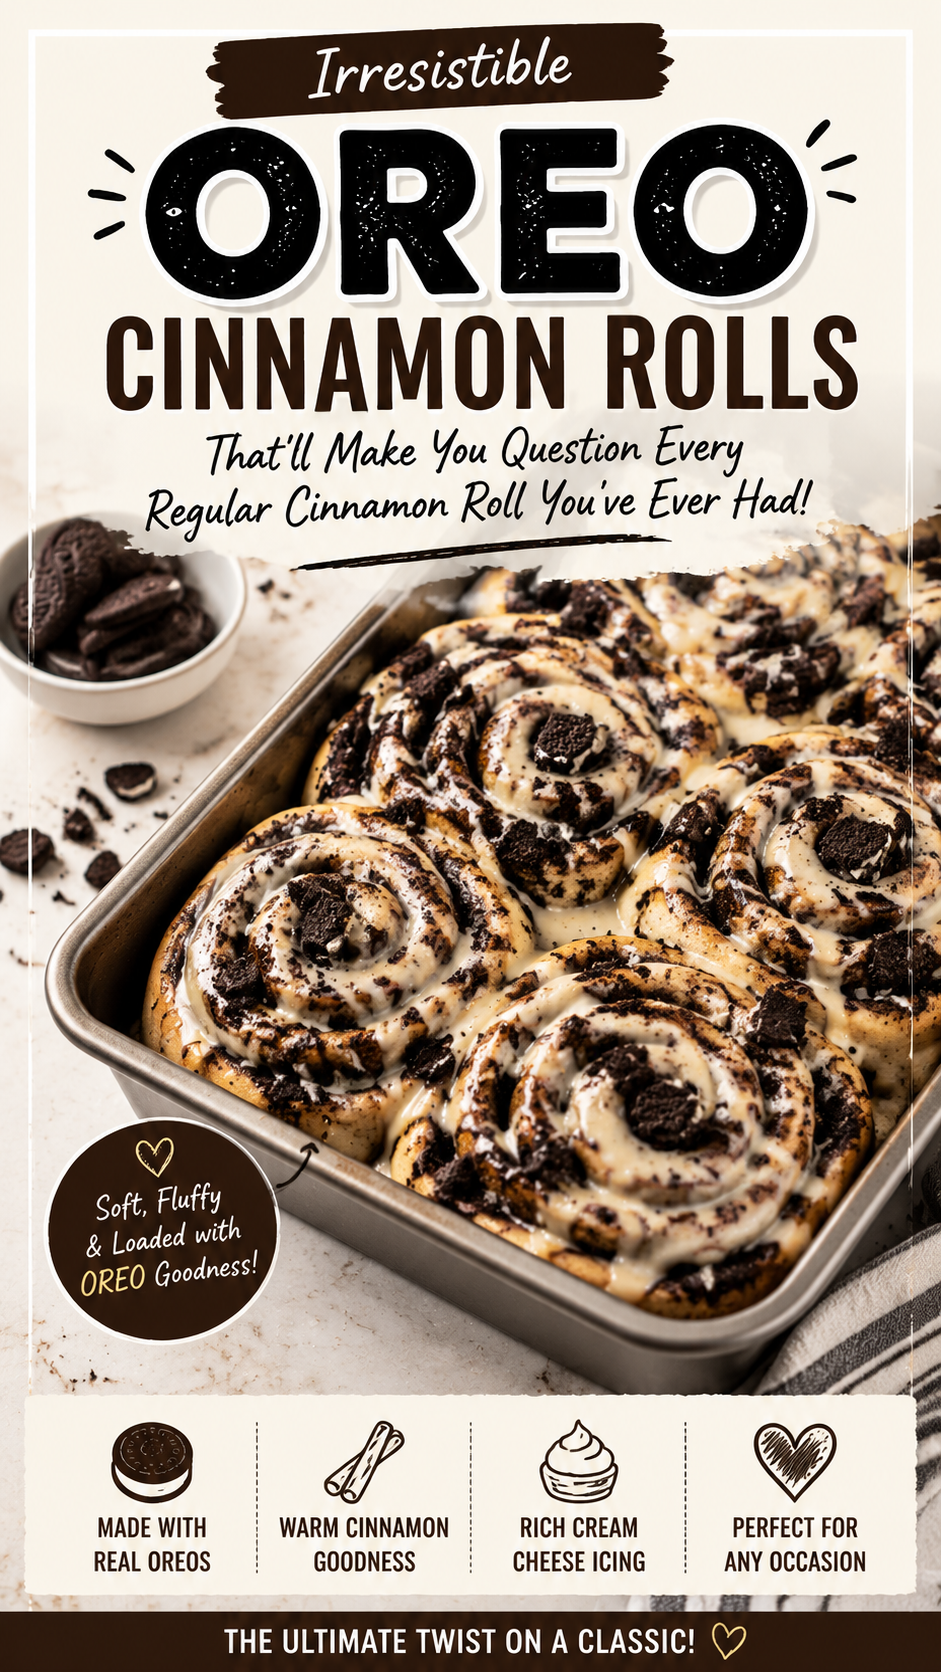
Oreo cinnamon rolls sound like they shouldn’t work. Two already-perfect things combined into one. But somehow, somehow, they work better than anything you’d expect.
The filling is dark and crumbly and chocolatey. The dough is soft and pillowy. And the cream cheese frosting? It tastes exactly like Oreo cream filling, but better because it’s warm and melted right into the top of the roll.
I’ve made a lot of cinnamon rolls in my life. These are a different category entirely.
Recipe at a Glance
| Detail | Info |
|---|---|
| Prep Time | 30 minutes |
| Rise Time | 1 hour 30 minutes |
| Bake Time | 22–25 minutes |
| Total Time | ~2 hours 25 minutes |
| Servings | 12 rolls |
| Difficulty | Intermediate |
| Best For | Brunch, special occasions, weekend baking |
What You’ll Need
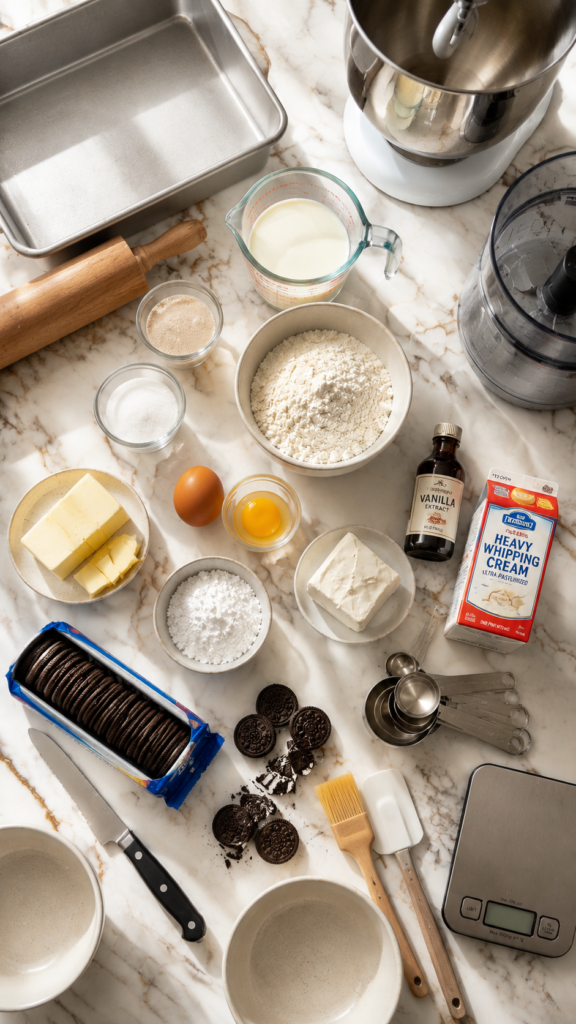
For the Dough
- 1 cup (240ml) whole milk, warmed to 110°F (43°C)
- 2¼ tsp (7g) active dry yeast (1 standard packet)
- ¼ cup (50g) granulated sugar
- 1 large egg + 1 egg yolk, at room temperature
- ¼ cup (57g) unsalted butter, melted and slightly cooled
- 3½ cups (440g) all-purpose flour, plus extra for dusting
- 1 tsp salt
For the Oreo Filling
- 24 Oreo cookies (about 2 cups when crushed)
- ⅓ cup (67g) granulated sugar
- 1 tsp ground cinnamon
- 6 tbsp (85g) unsalted butter, softened to room temperature
For the Oreo Cream Cheese Frosting
- 8 oz (226g) cream cheese, softened to room temperature
- 1½ cups (180g) powdered sugar, sifted
- 1 tsp vanilla extract
- 3–4 tbsp (45–60ml) heavy cream
- 8 Oreo cookies, crushed (for topping)
Tools You’ll Need
- Stand mixer with dough hook attachment (or large mixing bowl + sturdy wooden spoon)
- 9×13 inch (23x33cm) baking pan
- Rolling pin
- Food processor or zip-lock bag + rolling pin (for crushing Oreos)
- Measuring cups and spoons
- Kitchen scale (recommended for accuracy)
- Instant-read thermometer
- Pastry brush
- Sharp serrated knife or unflavored dental floss (for slicing rolls)
- Two mixing bowls
- Rubber spatula
Pro Tips
These are the things nobody tells you when you’re making cinnamon rolls for the first time.
1. Warm milk temperature is non-negotiable. Too hot and it kills the yeast. Too cold and the yeast won’t activate. 110°F is the sweet spot. If you don’t have a thermometer, it should feel warm like bathwater, not hot.
2. Don’t skip the two-egg method. One whole egg plus one yolk gives the dough richness without making it too heavy. It’s a small detail that makes a big difference in the final texture.
3. Your dough should be slightly tacky, not sticky. If it’s sticking to your hands like glue, add a tablespoon of flour at a time. If it’s totally dry and stiff, add a splash of milk. You want it to feel soft and slightly clingy.
4. Crush the Oreos to a fine crumb, not a powder. You want texture in every bite. A pulse in the food processor works perfectly. Leave a few slightly bigger pieces in there.
5. Use dental floss to slice. Slide unflavored dental floss under the log, cross the ends over the top, and pull. You get perfectly clean slices without compressing the dough. A serrated knife works too, but floss is genuinely a game changer.
Substitutions and Variations
No active dry yeast? Instant yeast works too. Use the same amount, but you can skip proofing it separately and add it straight to the flour.
Dairy-free? Swap whole milk for oat milk or full-fat coconut milk. Use vegan butter in the filling and dairy-free cream cheese in the frosting. It works surprisingly well.
Golden Oreos instead of regular? Yes, absolutely. The filling becomes a vanilla caramel situation that’s completely different but equally good.
Want extra chocolate? Add 2 tablespoons of cocoa powder to the dough itself. The rolls turn a dark, moody color and taste like a chocolate cinnamon roll with an Oreo soul.
Cream cheese not your thing? A simple vanilla glaze (powdered sugar + milk + vanilla) is lighter and still pairs well with the chocolate filling.
Make-Ahead Tips
You can make these the night before, which is honestly the move if you want fresh rolls in the morning without a two-and-a-half hour wait.
After slicing and placing the rolls in the pan, cover tightly with plastic wrap and refrigerate overnight (up to 12 hours). In the morning, pull them out and let them come to room temperature and finish rising for about 45–60 minutes before baking as directed.
The frosting can also be made ahead and stored in the fridge. Just let it soften slightly before spreading.
How to Make Oreo Cinnamon Rolls
Step 1: Proof the Yeast
In the bowl of your stand mixer (or a large bowl), combine the warm milk, yeast, and 1 tablespoon of the granulated sugar.
Stir gently and let it sit for 5–10 minutes. It should get foamy and smell a little yeasty. If nothing happens, your yeast is dead. Start over with a fresh packet.
Step 2: Make the Dough
Add the rest of the sugar, the egg, egg yolk, and melted butter to the yeast mixture. Mix on low until combined.
Add the flour and salt. Mix on medium-low until a shaggy dough forms, then increase to medium and knead for 6–8 minutes until the dough is smooth, elastic, and just slightly tacky.
If kneading by hand, knead on a lightly floured surface for 8–10 minutes.
Step 3: First Rise
Shape the dough into a ball and place it in a lightly greased bowl. Cover with plastic wrap or a clean kitchen towel.
Let it rise in a warm spot for 1 hour, or until it’s doubled in size.
Pro tip: Turn your oven to the lowest setting for 2 minutes, then turn it off. Place the covered dough inside. The residual warmth creates the perfect rise environment.
Step 4: Make the Oreo Filling
While the dough rises, pulse 24 Oreos in a food processor until you get mostly fine crumbs with a few slightly larger pieces.
Mix the crushed Oreos with the granulated sugar and cinnamon in a bowl. Set aside.
Step 5: Roll and Fill
Once the dough has doubled, punch it down gently and turn it out onto a lightly floured surface.
Roll it into a rectangle, roughly 16×12 inches (40x30cm). Try to keep it as even as possible.
Spread the softened butter evenly over the dough, leaving a ½-inch border along one long edge.
Sprinkle the Oreo filling evenly over the butter, pressing it down gently so it sticks.
Step 6: Roll and Slice
Starting from the long edge opposite the bare border, roll the dough tightly into a log.
Pinch the seam closed. Place the log seam-side down.
Using dental floss or a serrated knife, slice the log into 12 even rolls (each about 1½ inches wide).
Step 7: Second Rise
Place the rolls in a greased 9×13 inch pan, cut-side up, with a little space between each one.
Cover and let rise for 30–45 minutes, until they’re puffed and touching each other.
Preheat your oven to 350°F (175°C) while the rolls are on their second rise.
Step 8: Bake
Bake for 22–25 minutes, until the tops are lightly golden. Don’t overbake. The center rolls should be just set.
Note: They might look slightly underdone at 22 minutes. That’s actually ideal. They firm up as they cool and the frosting will finish them perfectly.
Step 9: Make the Frosting
While the rolls bake, beat the softened cream cheese with a hand mixer or whisk until completely smooth.
Add the powdered sugar gradually and mix until fluffy. Add the vanilla and enough heavy cream to get a spreadable, slightly pourable consistency.
Fold in half the crushed Oreos.
Step 10: Frost and Serve
Let the rolls cool for 5 minutes after coming out of the oven. Not longer. You want them warm.
Spread the frosting generously over the warm rolls. The heat will melt it slightly into all the layers. Sprinkle the remaining crushed Oreos on top.
Serve immediately. 🖤
Nutritional Information (Per Roll, Approximate)
| Nutrient | Amount |
|---|---|
| Calories | ~480 kcal |
| Carbohydrates | 62g |
| Protein | 7g |
| Fat | 22g |
| Saturated Fat | 12g |
| Sugar | 32g |
| Fiber | 1.5g |
| Sodium | 310mg |
These are estimates and will vary based on specific brands and ingredient amounts used.
Meal Pairing Suggestions
These rolls are rich. Pair them with something that cuts through that.
- A strong black coffee or cold brew
- Unsweetened hot tea (Earl Grey is genuinely great with the chocolate)
- A simple fruit salad on the side to balance the sweetness
- Fresh orange juice if you’re doing a full brunch spread
Leftovers and Storage
Room temperature: Store covered at room temperature for up to 2 days.
Refrigerator: Store in an airtight container for up to 5 days. The texture holds up well.
Freezer: Freeze unfrosted rolls tightly wrapped for up to 2 months. Thaw at room temperature and frost right before serving.
Reheating: Microwave individual rolls for 20–30 seconds. A splash of milk on top before microwaving keeps them from drying out.
Avoid refrigerating them frosted and uncovered. The Oreo topping gets soggy. Store them covered or skip the topping until you’re ready to eat.
FAQ
Can I make these without a stand mixer?
Yes. It just takes more elbow grease. Knead by hand on a floured surface for 8–10 minutes until the dough is smooth and elastic. It’s a bit of a workout but totally doable.
My rolls came out bready and dense. What happened?
A few possible culprits: too much flour in the dough, yeast that wasn’t fully activated, or not enough rise time. Make sure your milk is the right temperature and give the dough enough time to double fully before moving on.
Can I use store-bought cinnamon roll dough?
Technically yes, but the texture won’t be the same. The homemade dough here is specifically developed to be rich and pillowy, which is what makes the Oreo filling shine. Store-bought will still taste good, just different.
The filling fell out when I sliced the rolls. Help.
Roll the log tightly. And if you chilled the log for 15–20 minutes before slicing, it holds its shape much better. Also, don’t skip pressing the filling down gently after sprinkling.
Can I double the recipe?
Absolutely. Use two 9×13 pans. Everything scales directly.
My frosting is too thick. How do I fix it?
Add heavy cream one tablespoon at a time and mix until you hit the right consistency. You want it thick enough to hold on the rolls but soft enough to slightly melt into them while warm.
Can I use double-stuffed Oreos?
Yes, and you probably should. More cream filling in the cookie means a slightly richer, more intensely flavored crumb.
Wrapping Up
Here’s what I keep coming back to with this recipe: it feels special, but it’s not complicated.
You’re not doing anything wild. You’re making a soft, enriched dough. You’re crushing some Oreos. You’re making a cream cheese frosting that just happens to taste like the best thing you’ve ever put on a roll.
The result is something that genuinely surprises people. Every single time.
Make them for a weekend brunch. Make them when someone needs cheering up. Make them at 10 PM because you want something ridiculously good and you have all the ingredients.
And when you do, I’d love to hear about it. Drop a comment below and let me know how they turned out. Any tweaks you made, any questions that came up, any moments of “oh wow” when you took that first bite.
That’s the whole point of cooking something like this.