
You’ve been buying it from the drive-thru for years. But what if you could make it taste even better in your own kitchen?
This KFC-style crispy fried chicken is the recipe I kept seeing people rave about, and after testing it myself, I completely get why. The coating has that iconic crunch. The seasoning hits every single note. And the chicken stays unbelievably juicy on the inside.
Fair warning: once you make this, the drive-thru loses its appeal. 🍗
Recipe at a Glance
| Detail | Info |
|---|---|
| Prep Time | 20 minutes |
| Marinate Time | 2 hours (or overnight) |
| Cook Time | 30–35 minutes |
| Serves | 4 people |
| Difficulty | Medium |
| Best For | Family dinners, game nights, meal prep |
Why This Recipe Works
KFC uses a pressure fryer and a closely guarded spice blend. Home cooks can’t replicate that exactly, and honestly, that’s fine.
What you can do is get 90% of the way there with a buttermilk marinade, the right 11-spice blend, and a double-dredge technique that builds serious crunch.
The secret nobody talks about? The marinade matters more than the coating. Skip it, and no amount of seasoning will save dry, flavorless chicken.
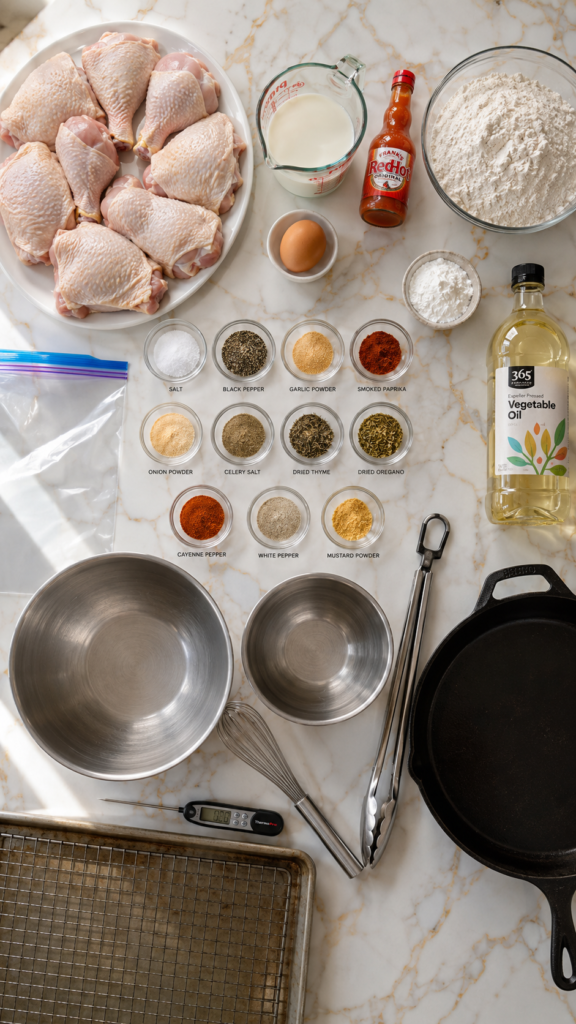
What You’ll Need
For the Buttermilk Marinade
- 2 lbs (900g) bone-in, skin-on chicken pieces (drumsticks, thighs, and/or breasts)
- 1 cup (240ml) buttermilk
- 1 egg
- 1 tsp salt
- 1 tsp black pepper
- 1 tsp garlic powder
- 1 tsp paprika
- 1 tsp hot sauce (like Tabasco or Frank’s)
For the Seasoned Flour Coating
- 2 cups (240g) all-purpose flour
- 2 tbsp cornstarch
- 1 tsp salt
- 1 tsp black pepper
- 1 tsp garlic powder
- 1 tsp onion powder
- 1 tsp smoked paprika
- 1 tsp celery salt
- 1 tsp dried thyme
- 1 tsp dried oregano
- 1 tsp cayenne pepper
- 1 tsp white pepper
- ½ tsp mustard powder
For Frying
- 4–6 cups (960ml–1.4L) vegetable oil or peanut oil
Tools You’ll Need
- Large mixing bowls (at least 2)
- Whisk
- Large zip-lock bag or airtight container (for marinating)
- Cast iron skillet or deep Dutch oven
- Cooking thermometer (this is non-negotiable)
- Wire rack + baking sheet
- Tongs
- Paper towels
Pro Tips
These are the things I wish someone had told me the first time I made this recipe.
- Use a thermometer, always. Oil temperature is everything. Too low and the coating absorbs grease. Too high and it burns before the chicken cooks through. You want 350°F (175°C), no guessing.
- Double-dredge for extra crunch. After the first coat of flour, dip back into the buttermilk and coat again. It sounds fussy but it takes 30 seconds and makes a huge difference.
- Let the dredged chicken rest for 5–10 minutes before frying. This helps the coating stick and creates an even crustier exterior.
- Don’t crowd the pan. Fry in batches. Crowding drops the oil temperature and leads to soggy, sad chicken. Give each piece its space.
- Rest on a wire rack, not paper towels. Paper towels trap steam under the coating. A wire rack keeps the bottom crispy too.
Substitutions and Variations
No buttermilk? Mix 1 cup of regular milk with 1 tbsp of white vinegar or lemon juice. Let it sit for 5 minutes before using.
Spice level: Reduce or skip the cayenne for a milder version. Double it if you want heat.
Air fryer option: Spray coated chicken generously with oil and air fry at 375°F (190°C) for 25–30 minutes, flipping halfway. Not quite identical, but still really good.
Gluten-free: Swap all-purpose flour for a 1:1 gluten-free flour blend. Add 2 extra tbsp of cornstarch for extra crunch.
Boneless option: Chicken breasts and thighs (cut into strips) work great too. Reduce frying time to 8–10 minutes.
Make-Ahead Tips
- Marinate overnight. The longer the chicken sits in buttermilk, the more tender and flavorful it gets. Up to 24 hours works perfectly.
- Mix the seasoned flour ahead of time and store it in an airtight container for up to 2 weeks.
- Fry and refrigerate. You can fry the chicken a few hours in advance and reheat it in the oven at 375°F for 10–12 minutes to bring the crunch back.
How to Make KFC-Style Crispy Fried Chicken
Step 1: Make the Buttermilk Marinade
Whisk together the buttermilk, egg, salt, pepper, garlic powder, paprika, and hot sauce in a large bowl.
Add the chicken pieces and make sure every piece is coated. Cover and refrigerate for at least 2 hours, but overnight is ideal.
Step 2: Mix the Seasoned Flour
Combine the flour, cornstarch, and all the spices in a large bowl and whisk until everything is evenly distributed.
Taste the dry mix. It should smell and taste intensely seasoned. That’s correct.
Step 3: Dredge the Chicken
Remove each piece of chicken from the marinade, letting the excess drip off.
Coat it thoroughly in the seasoned flour, pressing the flour into every crevice. For extra crunch, dip it back into the leftover buttermilk and coat in flour a second time.
Set the coated pieces on a wire rack and let them rest for 5–10 minutes.
Step 4: Heat the Oil
Pour oil into your cast iron skillet or Dutch oven to about 2–3 inches (5–7cm) deep.
Heat it over medium-high heat until it reaches 350°F (175°C). Use a thermometer. Don’t skip this.
Step 5: Fry the Chicken
Carefully lower the chicken pieces into the oil using tongs.
Fry in batches, cooking dark meat (thighs, drumsticks) for 14–16 minutes and white meat (breasts) for 12–14 minutes, turning occasionally.
The coating should be deep golden brown and the internal temperature of the chicken should reach 165°F (74°C).
Step 6: Rest and Serve
Transfer the fried chicken to a wire rack over a baking sheet.
Let it rest for 5 minutes before serving. This keeps the juices locked in.
Serve with mashed potatoes, coleslaw, or biscuits for the full experience.
Nutritional Breakdown (Per Serving, Approx.)
| Nutrient | Amount |
|---|---|
| Calories | ~520 |
| Protein | 38g |
| Fat | 28g |
| Carbohydrates | 30g |
| Sodium | 780mg |
Nutrition varies based on chicken cut and oil absorbed during frying.
Meal Pairing Suggestions
- Classic: Mashed potatoes with gravy + coleslaw
- Lighter: Side salad with a tangy vinaigrette
- Southern-style: Buttermilk biscuits + corn on the cob
- Kid-friendly: Mac and cheese + steamed broccoli
- For leftovers: Slice cold chicken over a Caesar salad (genuinely amazing)
Leftovers and Storage
Fridge: Store fried chicken in an airtight container for up to 4 days.
Freezer: Wrap each piece individually and freeze for up to 3 months.
To reheat (and keep it crispy): Preheat oven or air fryer to 375°F (190°C). Reheat for 10–15 minutes. The oven works. The microwave does not.
Avoid microwaving if you can help it. The coating goes soft and sad, and nobody wants that.
FAQ
Can I use boneless skinless chicken?
Yes. Boneless thighs are especially good because they stay juicier than breasts. Reduce frying time to 8–10 minutes and check for 165°F internal temp.
What oil is best for frying chicken?
Peanut oil gives the best flavor and has a high smoke point, making it ideal for frying. Vegetable oil and canola oil work great too. Avoid olive oil.
My coating keeps falling off. What am I doing wrong?
Two likely culprits: (1) you skipped the resting time after dredging, or (2) the oil wasn’t hot enough when the chicken went in. Both cause the coating to slip.
The chicken is golden brown but not cooked through. Help.
This usually means the oil was too hot. The outside cooked faster than the inside could. Lower your oil temperature slightly and fry a little longer.
Can I bake this instead of frying?
You can! Brush with oil and bake at 425°F (220°C) for 40–45 minutes. It won’t have quite the same crunch as deep frying, but it’s still really good.
Is this actually the KFC recipe?
KFC’s exact recipe is a trade secret, but this version uses 11 herbs and spices and the same buttermilk-marinate approach. It’s close enough that people often can’t tell the difference. 👀
Wrapping Up
You now have everything you need to make genuinely great crispy fried chicken at home.
The marinade, the double-dredge, the oil temperature, the wire rack. Those aren’t extra steps. Those are the steps that make it actually good.
And honestly? There’s something really satisfying about pulling a batch of perfectly golden, crispy, juicy chicken out of the pan yourself. It feels like a win every single time.
Give this recipe a try and let me know how it goes in the comments below! I’d love to hear if you made any tweaks, tried a variation, or just want to share that it came out perfectly. Leave any questions down there too. 🙌