
You’ve had croissants. You’ve had muffins. But have you had the lovechild of both, fresh out of your own oven?
That’s the cruffin. And once you make one, it’ll ruin every sad store-bought pastry for you. In the best way.
I’ll be upfront: cruffins look wildly impressive. People will ask if you went to culinary school. You did not. You just followed this recipe.
Recipe at a Glance
| Detail | Info |
|---|---|
| Prep Time | 30 minutes |
| Rest/Chill Time | 2 hours (or overnight) |
| Bake Time | 25 minutes |
| Total Time | ~3 hours |
| Yield | 12 cruffins |
| Difficulty | Medium |
| Diet | Vegetarian |
What Even Is a Cruffin?
A cruffin is croissant dough baked in a muffin tin.
That’s it. That’s the whole concept.
But don’t let the simplicity fool you. The result is something with laminated, flaky layers on the outside, a soft buttery pull-apart interior, and this gorgeous swirled top that looks like it took three times longer than it actually did.
They came out of San Francisco in the early 2010s from a bakery called Mr. Holmes Bakehouse. Lines wrapped around the block. People waited hours for these things. 😤
You don’t have to wait in any line today.
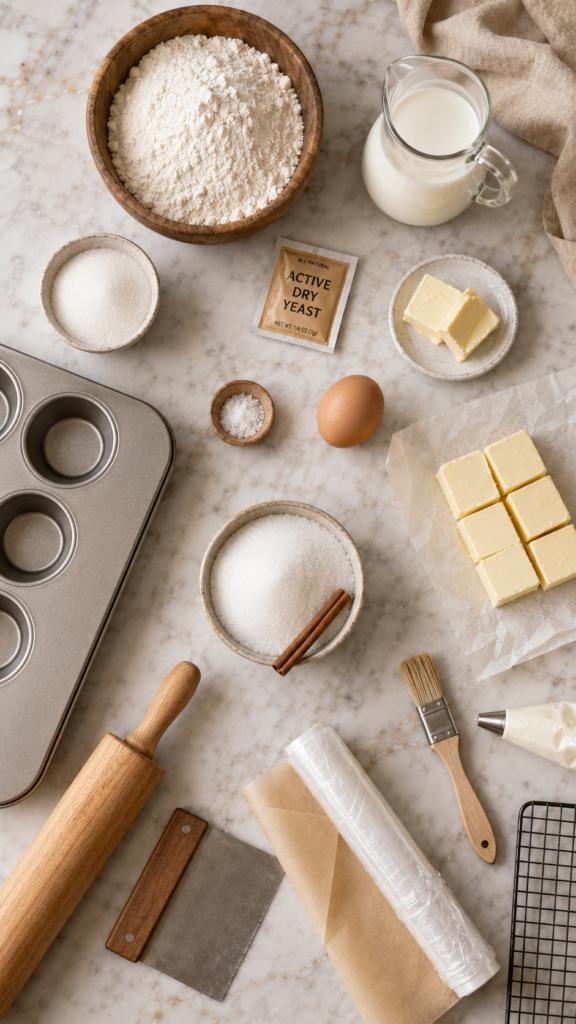
What You’ll Need
For the Dough
- 3 cups (360g) all-purpose flour, plus extra for dusting
- 2 1/4 tsp (7g) active dry yeast (one standard packet)
- 1 tbsp granulated sugar
- 1 tsp fine sea salt
- 3/4 cup (180ml) whole milk, warmed to 110°F
- 2 tbsp unsalted butter, softened
- 1 large egg, room temperature
For the Butter Block (Lamination)
- 1 cup (225g) unsalted butter, cold
For Finishing
- 1/2 cup (100g) granulated sugar (for rolling)
- Optional: 1 tsp cinnamon mixed into the sugar
- Optional filling: pastry cream, lemon curd, Nutella, or jam
Tools You’ll Need
- Stand mixer with dough hook (or a bowl + your hands)
- Rolling pin
- Muffin tin (standard 12-cup)
- Parchment paper
- Bench scraper or sharp knife
- Plastic wrap
- Pastry brush
- Wire cooling rack
- Small saucepan (if making pastry cream)
- Piping bag with tip (for fillings, if using)
Pro Tips
These are the things I wish someone had told me the first time I made cruffins.
- Cold butter is non-negotiable. If your butter gets warm during lamination, it melts into the dough instead of layering. Work fast, and pop everything back in the fridge if it starts feeling greasy.
- Don’t skip the overnight chill. You can do this same-day, but resting the shaped cruffins overnight in the fridge gives you significantly better rise and flavor. It’s the lazy shortcut that actually makes them better.
- Overfill the muffin cups on purpose. The dough should peek above the rim. This is what creates that stunning swirled crown on top.
- Sugar them while hot. Roll the cruffins in sugar immediately when they come out of the oven. The heat makes the sugar stick perfectly. Wait too long and it just falls off.
- Let them cool at least 10 minutes before filling. Piping cream into a scorching hot cruffin will melt your filling and you’ll be sad about it.
How to Make Cruffins
Step 1: Make the Dough
In your stand mixer bowl, combine the warm milk and sugar. Sprinkle the yeast over the top and let it sit for 5-10 minutes until it’s foamy and active.
Add the flour, salt, egg, and softened butter. Mix on medium-low with the dough hook for about 8 minutes until the dough is smooth and slightly tacky but not sticky.
Shape it into a ball, place it in a lightly oiled bowl, cover with plastic wrap, and let it rise for 1 to 1.5 hours at room temperature until doubled.
Step 2: Make the Butter Block
While the dough rises, prepare your butter.
Place the cold butter between two sheets of parchment paper. Use a rolling pin to pound and roll it into a flat rectangle, roughly 6×8 inches. Keep it cold but pliable.
If it gets too soft, pop it in the fridge for 10-15 minutes. You want it firm enough to hold its shape but flexible enough not to crack when you fold it.
Step 3: Laminate the Dough
This is the step that creates those iconic flaky layers. Don’t rush it.
Roll the risen dough out on a lightly floured surface into a rectangle roughly double the size of your butter block, about 12×8 inches.
Place the butter block in the center and fold the dough over it like an envelope, sealing the edges.
Now roll it out gently into a long rectangle (about 8×18 inches). Fold it into thirds like a letter. This is called a “turn.”
Wrap in plastic and refrigerate for 30 minutes.
Repeat this process two more times (roll out, fold into thirds, chill). Three turns total.
After the final chill, you’re ready to shape.
Step 4: Shape the Cruffins
Roll the laminated dough into a large thin rectangle, roughly 12×18 inches.
Cut it into 12 strips, each about 1.5 inches wide and 12 inches long.
Take one strip and roll it up tightly from one end, like a cinnamon roll. Then stand it upright and drop it into a greased muffin cup. The layers should be visible and the top should have a swirled center.
Repeat with all 12 strips.
Cover loosely and refrigerate overnight (or let them proof at room temperature for 1.5 to 2 hours if baking same-day).
Step 5: Bake
Preheat your oven to 375°F (190°C).
Bake the cruffins for 22-25 minutes until deep golden brown. They should look slightly darker than you’d expect since the layers need to cook through.
While still hot, remove them from the tin and roll each one in the sugar (or cinnamon sugar). Set on a wire rack to cool.
Fill with your choice of pastry cream, lemon curd, or Nutella using a piping bag, if desired.
Substitutions and Variations
No stand mixer? You can knead the dough by hand for about 10-12 minutes. It’s a workout, but it works.
Dairy-free? Use a good-quality vegan butter (Miyoko’s works well) and plant-based milk. The texture will be slightly different but still delicious.
Sugar coating swaps:
- Cinnamon sugar (classic)
- Cardamom sugar (feels fancy, tastes incredible)
- Vanilla sugar
- Plain powdered sugar dusted on after cooling
Filling ideas:
- Vanilla pastry cream
- Lemon curd
- Nutella or chocolate ganache
- Strawberry jam
- Pistachio cream (trust me on this one)
Savory cruffin? Skip the sugar coating and fill with cheese and herbs instead. Great for brunches.
Make-Ahead Tips
Cruffins are actually ideal for making ahead.
- Shape and refrigerate overnight: After placing them in the muffin tin, cover tightly and refrigerate overnight (up to 16 hours). Pull them out 30 minutes before baking to take the chill off.
- Freeze unbaked: You can freeze the shaped, unproofed cruffins for up to a month. Thaw in the fridge overnight, then bring to room temp before baking.
- Freeze baked (unfilled): Bake, cool completely, skip the sugar coat and filling, then freeze in an airtight bag. Reheat at 325°F for 10 minutes, then sugar and fill fresh.
Nutritional Info (Per Cruffin, Plain)
| Nutrient | Amount |
|---|---|
| Calories | ~320 |
| Total Fat | 18g |
| Saturated Fat | 11g |
| Carbohydrates | 34g |
| Sugars | 8g |
| Protein | 5g |
| Sodium | 180mg |
Note: These are estimates and will vary based on exact measurements and any fillings added.
Dietary notes:
- Vegetarian: Yes
- Vegan: No (but adaptable, see substitutions)
- Gluten-free: Not easily adaptable
- Nut-free: Yes (unless using nut-based fillings)
Meal Pairing Suggestions
Cruffins are a breakfast and brunch superstar. Pair them with:
- A strong espresso or a latte
- Fresh fruit salad to balance the richness
- A light yogurt parfait
- Mimosas for weekend brunches (obviously)
They also work as a dessert paired with vanilla ice cream or whipped cream if you’ve filled them with something like lemon curd or chocolate.
Leftovers and Storage
Room temperature: Store unfilled cruffins in an airtight container for up to 2 days. They’ll lose some crunch but still taste great.
Refrigerator: If filled, refrigerate in an airtight container for up to 3 days.
Freezer: Unfilled and un-sugared, they freeze well for up to 1 month (see make-ahead tips above).
To refresh: Pop a day-old cruffin in a 325°F oven for 5-7 minutes. It’ll crisp right back up.
Don’t microwave them. The layers go soggy and it’s a tragedy.
FAQ
Can I use store-bought croissant dough?
You can, and it’ll still taste good! But homemade laminated dough gives you significantly more control over the layers and flavor. If you’re short on time, canned crescent roll dough also works in a pinch.
My dough is tearing during lamination. What went wrong?
Usually this means the butter was too cold and cracked, or the dough was too stiff. Let the dough rest 5 minutes at room temp before rolling, and make sure the butter is pliable (bends without cracking) before encasing it.
Can I make smaller cruffins?
Yes! Cut narrower strips (1 inch instead of 1.5) and use a mini muffin tin. Reduce baking time to around 15-18 minutes.
Why didn’t my cruffins have defined layers?
This usually happens when the butter melted into the dough during lamination. Work in a cool kitchen, chill between each turn, and don’t let the dough sit out too long at any stage.
How do I know when they’re done baking?
They should be a deep golden brown, almost mahogany. If they look “normal” golden, give them another 3-5 minutes. Underbaking leads to a doughy interior.
Do I have to fill them?
Absolutely not. A plain cruffin rolled in cinnamon sugar is perfect all on its own. Fillings are just a bonus.
Can I double the recipe?
Yes, just double everything proportionally. You might need to work in batches depending on your workspace and oven size.
Wrapping Up
Okay, here’s the thing. Cruffins feel intimidating the first time you look at a recipe.
Lamination? Butter blocks? Turns?
But once you’ve done it once, you’ll realize it’s mostly just rolling dough, folding it, and being patient. The steps aren’t hard. They just take a little time.
And the payoff? Completely worth every minute.
You pull these out of the oven and your whole kitchen smells like a French bakery. You roll them in sugar and they come out looking like something from a food magazine. You bite into one and there are all these flaky, buttery layers that just pull apart perfectly.
It’s one of those recipes that makes you feel like you really know what you’re doing in the kitchen. 😌
Give these a try this weekend and let me know how it goes in the comments below! Did you fill them? What did you use? Any questions about the process? Drop them down there and I’ll help you out.