You’ve seen it at every Korean picnic, lunchbox, and convenience store. That perfectly rolled cylinder of rice, veggies, and fillings wrapped in seaweed.
And you’ve probably assumed it’s complicated to make.
It’s really not.
Kimbap (김밥) is one of those dishes that looks impressive and tastes incredible, but once you’ve made it twice, you’ll wonder why you ever ordered takeout. It’s fresh, filling, and completely customizable. Plus it travels well, so it’s genuinely one of the best things you can pack for a day out.
Here’s everything you need to know to make it at home.
Recipe at a Glance
| Detail | Info |
|---|---|
| Prep Time | 25 minutes |
| Cook Time | 20 minutes |
| Total Time | 45 minutes |
| Servings | 4 rolls (about 24–28 pieces) |
| Difficulty | Easy |
| Cuisine | Korean |
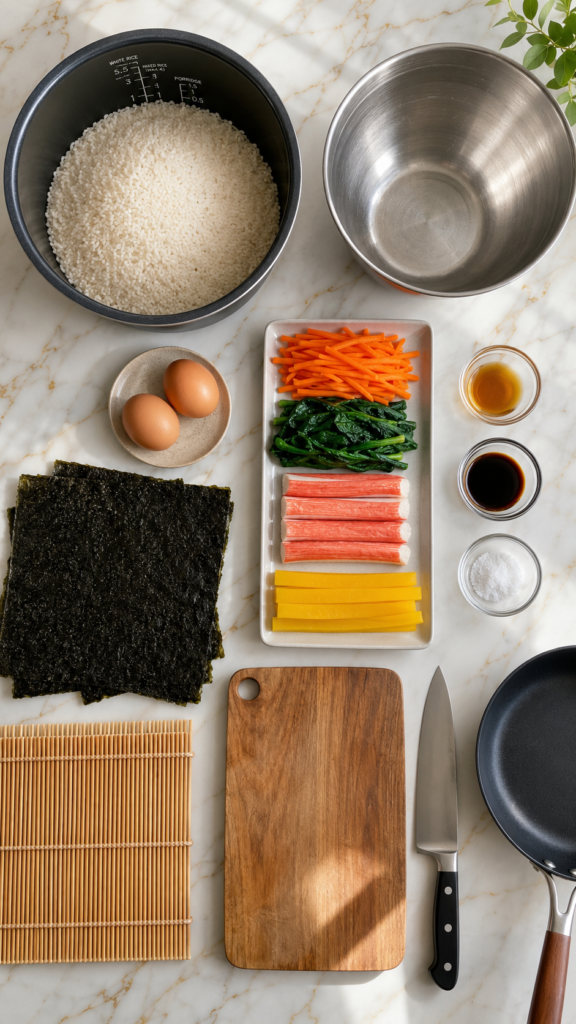
What You’ll Need
For the Rice
- 2 cups short-grain white rice (uncooked)
- 1 tbsp sesame oil
- 1 tsp salt
For the Fillings
- 4 sheets of gim (dried seaweed / nori)
- 2 large eggs
- 1 medium carrot, julienned
- 1 cup spinach (fresh or blanched)
- 4 imitation crab sticks (or real crab, your call)
- 4 strips of yellow danmuji (pickled radish)
- 1 tsp soy sauce
- 1 tsp sesame oil (for spinach)
- Salt and pepper, to taste
- Neutral oil (for cooking eggs and carrots)
Optional Add-Ins
- Bulgogi beef strips
- Avocado slices
- Tuna mixed with mayo
- Cucumber strips
Tools You’ll Need
- Rice cooker or medium saucepan
- Large bamboo sushi rolling mat
- Sharp knife
- Large mixing bowl
- Non-stick skillet or pan
- Cutting board
- Small bowl for sesame oil finishing
Pro Tips
These are the things nobody tells you until after your first attempt goes sideways.
1. Use short-grain rice, not long-grain. Long-grain rice doesn’t have enough starch to hold together when you roll it. Short-grain (sushi rice works too) gives you that perfectly sticky, cohesive texture that actually stays rolled.
2. Season the rice while it’s still warm. Cold rice doesn’t absorb sesame oil and salt the same way. Mix it in right after cooking and you’ll taste the difference immediately.
3. Don’t overfill. This is the most common mistake. Less filling than you think = a tighter, cleaner roll. More filling than you think = a rice explosion the moment you try to cut it. 😅
4. Wet the edge of the seaweed before sealing. Just a tiny bit of water on your fingertip along the last inch of the gim. It helps everything stick together without falling apart when you slice.
5. Let it rest before cutting. Give the roll 2–3 minutes before slicing. It firms up slightly and you’ll get cleaner cuts. Use a sharp knife and wipe it between slices.
How to Make Kimbap
Step 1: Cook the Rice
Cook 2 cups of short-grain rice according to your rice cooker instructions or stovetop method.
While still warm, transfer to a large bowl. Add 1 tbsp sesame oil and 1 tsp salt. Gently fold together and set aside to cool slightly. You don’t want it steaming hot when you assemble.
Step 2: Prep the Fillings
Eggs: Whisk 2 eggs with a pinch of salt. Cook in a lightly oiled pan over medium-low heat into a thin omelette. Slide it out, let it cool, and slice into long strips.
Carrots: Julienne your carrot into thin matchsticks. Sauté in a little oil for 2–3 minutes with a pinch of salt until just softened. Set aside.
Spinach: Blanch fresh spinach in boiling water for 30 seconds, rinse under cold water, squeeze out excess moisture, and season with 1 tsp sesame oil and a pinch of salt.
Crab sticks and danmuji: No cooking needed here. Just set them aside in long strips.
Step 3: Assemble the Rolls
Place a bamboo mat on your work surface with a sheet of gim (shiny side down) on top.
Spread a thin, even layer of rice over the seaweed, leaving about 1 inch of space at the top edge bare.
Lay your fillings horizontally across the bottom third of the rice. Keep them neat and parallel.
Step 4: Roll It Up
Using the bamboo mat, lift the bottom edge and roll it tightly over the fillings, pressing as you go. Continue rolling forward, using the mat to keep even pressure.
When you reach the bare edge of the gim, wet it lightly with your finger and press to seal.
Step 5: Slice and Finish
Brush the outside of the roll lightly with sesame oil (this gives it that gorgeous shine you see in photos).
Let it rest for 2–3 minutes.
Slice with a sharp knife into rounds about 1 inch thick. Wipe the blade between cuts for cleaner edges.
Serve immediately or pack for later.
Substitutions and Variations
Kimbap is incredibly flexible. Here are a few swaps worth knowing:
- No crab sticks? Use canned tuna mixed with a little mayo, or strips of bulgogi beef.
- Vegetarian version: Skip the crab entirely and load up on cucumber, avocado, and extra pickled radish.
- Vegan? Leave out the egg and use tofu strips marinated in soy sauce and sesame oil instead.
- Low-carb: Try cauliflower rice in place of white rice. It won’t hold quite as tightly, but it works.
- Spicy version: Add gochujang or sriracha mayo as a filling.
Make-Ahead Tips
Kimbap is actually one of the better make-ahead foods because it holds up well.
- Rice: Cook it up to a day ahead and store covered in the fridge. Re-warm slightly before using so it’s pliable.
- Fillings: The carrots, spinach, and egg strips can all be prepped the night before and stored separately in the fridge.
- Assembled rolls: Roll them, wrap tightly in plastic wrap, and refrigerate for up to 24 hours. Slice just before serving.
One thing to note: the seaweed softens in the fridge overnight. Some people love the slightly chewy texture this creates (it’s very common in Korean lunchboxes), others prefer the crisp seaweed of a freshly made roll. Up to you.
Nutrition Breakdown (Per Roll, Approximate)
| Nutrient | Amount |
|---|---|
| Calories | ~320 kcal |
| Carbohydrates | ~52g |
| Protein | ~10g |
| Fat | ~7g |
| Fiber | ~2g |
| Sodium | ~480mg |
Values are estimates and will vary based on fillings used.
Meal Pairing Suggestions
Kimbap is great on its own, but here’s what pairs well with it:
- Doenjang jjigae (Korean fermented soybean paste stew) for a full Korean meal
- Japchae (glass noodles with vegetables) as a side dish
- Simple miso soup if you want something lighter
- Kimchi on the side for a bit of heat and fermented tang
Leftovers and Storage
- Room temperature: Kimbap keeps well for 4–6 hours, making it ideal for packed lunches and picnics.
- Refrigerator: Store wrapped rolls for up to 24 hours. The texture changes slightly but it’s still good.
- Freezer: Not recommended. The rice gets grainy and the seaweed becomes unpleasantly soggy.
- Reheating: Kimbap is meant to be eaten at room temperature or cold. Don’t microwave it.
FAQ
What’s the difference between kimbap and sushi?
The biggest difference is in the rice. Sushi rice is seasoned with rice vinegar, giving it that tangy flavor. Kimbap rice is seasoned with sesame oil and salt, which gives it a nuttier, more savory taste. The fillings are also completely different. Kimbap typically uses cooked ingredients, not raw fish.
Can I make kimbap without a bamboo mat?
You can, but it’s harder. A clean kitchen towel or a piece of parchment paper can work as a substitute. The mat just gives you more control and even pressure when rolling.
Why does my kimbap fall apart when I cut it?
Usually one of three things: the rice wasn’t sticky enough (long-grain issue), the roll wasn’t tight enough, or you didn’t seal the edge properly. Also, cutting it too soon before it rests can cause it to come apart.
Is kimbap gluten-free?
Most of the base ingredients are naturally gluten-free, but soy sauce contains gluten. Swap it out for tamari or a certified gluten-free soy sauce and you’re good.
Can kids eat kimbap?
Absolutely. It’s actually a really popular lunchbox food for kids in Korea. You can customize the fillings to keep it simple and mild.
How do I keep the seaweed from getting soggy?
Eat it fresh. The seaweed softens naturally within a few hours, which is normal. If you want it crispier, assemble and serve immediately rather than making it ahead.
Wrapping Up
Kimbap is one of those recipes that gets better every single time you make it. The first roll might not be perfect. The second one will be better. By the third, you’ll wonder why you waited so long to try this.
It’s fresh, flexible, and genuinely satisfying to make from scratch. And once you’ve got the basic roll down, you can take it in a hundred different directions with whatever fillings you have on hand.
Give it a try this week and drop a comment below. I’d love to know what fillings you used, how your first roll turned out, or if you have any questions I can help with. 👇