I’ll be honest. I used to think homemade ice cream sandwiches were one of those things that looked great on Pinterest but were way too fussy to actually pull off.
Then I made them.
And now I can’t go back to those sad, cardboard-tasting rectangles from the freezer aisle. 😤
These are that good. Soft, fudgy chocolate cookie slabs hugging a thick slab of creamy vanilla ice cream. They hold together perfectly. They don’t turn into a soggy mess in your hands. And they taste like something you’d get at a fancy dessert shop.
The kind people post about. The kind you secretly eat two of and tell no one.
Recipe at a Glance
| Detail | Info |
|---|---|
| Prep Time | 25 minutes |
| Freeze Time | 4–6 hours (or overnight) |
| Cook Time | 12 minutes |
| Servings | 8 sandwiches |
| Difficulty | Easy |
| Total Time | ~5 hours (mostly hands-off) |
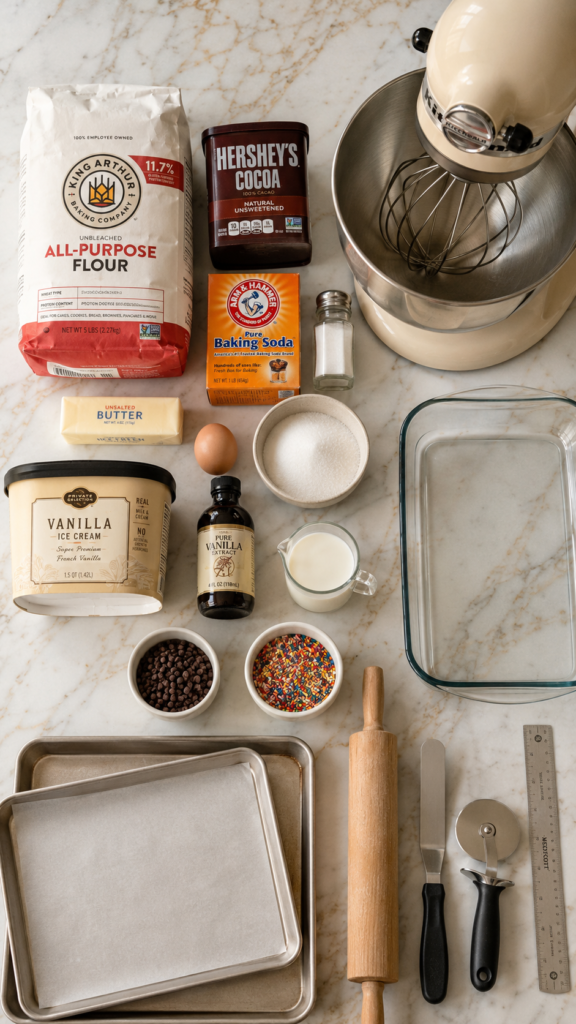
What You’ll Need
For the Chocolate Cookie Slabs
- 1 cup (125g) all-purpose flour
- ½ cup (50g) unsweetened cocoa powder
- ½ tsp baking soda
- ¼ tsp salt
- ½ cup (115g) unsalted butter, softened
- ¾ cup (150g) granulated sugar
- 1 large egg
- 1 tsp pure vanilla extract
- 2 tbsp whole milk
For the Ice Cream Filling
- 1.5 quarts (1.4 liters) good-quality vanilla ice cream, slightly softened
Optional Mix-Ins (Roll the Edges)
- ½ cup mini chocolate chips
- ½ cup rainbow sprinkles
- ½ cup crushed Oreos
- ½ cup chopped peanuts or pecans
Tools Required
- Stand mixer or hand mixer – for the cookie dough
- Two large baking sheets – lined with parchment paper
- Parchment paper – essential for rolling and assembly
- Rolling pin – to roll dough to an even thickness
- Offset spatula – to spread ice cream evenly
- Sharp knife or pizza cutter – to cut cookie slabs and sandwiches cleanly
- 9×13 inch baking pan – for assembling the ice cream layer
- Plastic wrap – to wrap and freeze the finished sandwiches
- Ruler (optional) – for perfectly even cuts
Pro Tips
These are the things I wish someone had told me the first time.
- Don’t skip the softened ice cream step. Pull it from the freezer about 10–15 minutes before you need it. Too hard and it tears the cookies. Too soft and it won’t hold its shape. That sweet spot matters.
- Roll your dough between two sheets of parchment. It keeps the thickness perfectly even, and zero sticking. A ¼ inch thickness is your sweet spot — any thicker and the cookie overpowers the ice cream; any thinner and it breaks.
- Bake low and slow. These bake at 325°F (not 350°F) because you want them soft, not crispy. Pull them out when they look slightly underdone. They firm up as they cool.
- Freeze the ice cream layer separately first. Instead of spreading ice cream on one cookie and panicking to put the top on, spread it in a pan, freeze it solid, then cut it to size and lay it on the cookie. Game changer.
- Wrap each sandwich individually. Once assembled, wrap them tightly in plastic wrap before freezing. This prevents freezer burn and keeps them from picking up weird smells.
Substitutions and Variations
No two batches have to be the same. Some ideas:
Cookie swaps:
- Use peanut butter cookies instead of chocolate for a PB&J vibe
- Try snickerdoodle cookies with cinnamon ice cream
- Use store-bought chocolate wafers (like Nabisco Famous) if you’re short on time — zero judgment
Ice cream swaps:
- Mint chocolate chip for a classic diner feel
- Coffee ice cream for something a little more grown-up
- Strawberry for a summery, fruity version
- Cookies and cream if you can’t get enough of a good thing
Dairy-free version:
- Swap butter for vegan butter (Earth Balance works well)
- Use any coconut milk or oat milk-based ice cream — they scoop and freeze beautifully
Gluten-free version:
- Replace all-purpose flour with a 1:1 GF baking flour (Bob’s Red Mill is reliable here)
Make-Ahead Tips
This recipe is practically designed for making ahead.
- Bake the cookies up to 3 days early. Store them in an airtight container at room temperature.
- Prep the ice cream slab the night before. Freeze it solid, then assemble and re-freeze in the morning.
- Assemble fully assembled sandwiches up to 2 weeks ahead. Wrap individually and freeze. Pull them out whenever a craving hits.
Nutritional Breakdown (Per Sandwich)
| Nutrient | Amount |
|---|---|
| Calories | ~380 kcal |
| Total Fat | 18g |
| Saturated Fat | 11g |
| Carbohydrates | 52g |
| Sugar | 36g |
| Protein | 5g |
| Fiber | 2g |
Based on vanilla ice cream and chocolate cookie slabs with no additional mix-ins. Values are estimates.
Meal Pairing Suggestions
These are perfect for:
- Summer BBQs — wrapped individually and pulled from the cooler
- Birthday parties — slice into mini sandwiches for a crowd
- Movie night — make a batch Sunday, eat them all week
- After school snacks — kids absolutely lose their minds over these
- Date night dessert — roll the edges in something fancy like crushed pistachios and call it gourmet
How to Make Ice Cream Sandwiches
Step 1: Make the Cookie Dough
Preheat your oven to 325°F (163°C). Line two baking sheets with parchment paper.
In a medium bowl, whisk together the flour, cocoa powder, baking soda, and salt. Set aside.
In your stand mixer (or with a hand mixer), beat the softened butter and sugar on medium-high for about 2 minutes, until light and fluffy. Add the egg and vanilla extract and beat another 30 seconds.
Turn the mixer to low and slowly add the flour mixture. Once it starts to combine, add the milk and mix until you have a soft, cohesive dough.
Step 2: Roll and Bake
Divide the dough in half. Place each half between two sheets of parchment paper and roll to ¼ inch thickness. Try to roll into a rough rectangle — it doesn’t need to be perfect, you’ll cut it later.
Slide each rolled dough sheet (still between parchment) onto a baking sheet and refrigerate for 15 minutes. This helps them hold their shape.
Remove the top sheet of parchment, then bake for 10–12 minutes. The cookies will look slightly underdone — that’s exactly what you want.
Let them cool completely on the pan. Don’t rush this step. Warm cookies + ice cream = a mess.
Step 3: Prep the Ice Cream Slab
While the cookies bake, line your 9×13 pan with plastic wrap, leaving plenty of overhang on all sides.
Let your ice cream sit at room temperature for 10–15 minutes, just until it’s spreadable. Scoop it all into the pan and use an offset spatula to spread it into an even layer, about 1 inch thick.
Fold the plastic wrap over the top, press gently, and freeze for at least 2 hours (or overnight).
Step 4: Assemble
Once cookies are fully cooled and ice cream slab is frozen solid, it’s time to build.
Trim your cookies into two equal rectangles using a pizza cutter or sharp knife. Lift your ice cream slab out of the pan using the plastic wrap overhang. Peel off the wrap and lay the slab on one cookie sheet.
Top with the second cookie sheet and press gently.
Cut into 8 individual sandwiches with one clean, confident slice per cut (sawing back and forth warms the ice cream). Work quickly.
Step 5: Roll the Edges (Optional but Highly Recommended)
Pour your mix-ins onto a plate. Roll the exposed ice cream edge of each sandwich through the topping until coated all around.
Step 6: Wrap and Freeze
Wrap each sandwich tightly in plastic wrap. Freeze for at least 2 more hours before serving — overnight is ideal for clean, firm sandwiches that hold together perfectly.
Leftovers and Storage
- In the freezer: Individually wrapped sandwiches keep for up to 2 weeks
- Texture note: After 2 weeks, the cookies can start to harden. Still delicious, just a bit more chewy
- Serving tip: Let them sit at room temp for 3–4 minutes before eating — that’s when the cookie goes from firm to perfectly soft
- Never refreeze melted sandwiches — they lose their texture and ice crystals form
FAQ
Can I use store-bought cookie dough?
Technically yes, but the texture won’t be the same. Store-bought dough usually bakes into a thicker, crispier cookie. If you do use it, roll it thin and keep a close eye on the bake time.
My cookies are too crispy. What went wrong?
Two likely culprits: the oven was too hot, or they baked too long. At 325°F, 10–12 minutes is usually enough. Pull them when they look just barely done.
Can I use any flavor of ice cream?
100%. The chocolate cookie pairs with almost everything. Strawberry, mint chip, salted caramel, coffee — all excellent choices.
Do I need a stand mixer?
No. A hand mixer works perfectly. You could even do this by hand with a wooden spoon if your butter is really soft and you have some patience.
Can I make mini sandwiches for a party?
Yes! After assembly, cut into smaller rectangles or even squares. Mini sandwiches are great for parties and kids love picking their own toppings.
How do I get clean cuts?
Use a sharp knife and cut straight down in one motion. Wipe the blade between cuts. Working quickly while the ice cream is still firm also makes a huge difference.
My ice cream keeps melting during assembly. Help.
Put the assembled sandwich back in the freezer for 10 minutes before cutting if it’s getting soft. You can also assemble one at a time and freeze between each one.
Wrapping Up
If you’ve made it this far, you already know you’re making these this weekend. 😄
There’s something genuinely satisfying about pulling one of these out of the freezer — wrapped up, perfectly assembled, exactly how you made it. No cardboard taste. No weird ingredients on the label. Just a really, really good ice cream sandwich.
Make them for a BBQ. Make them for no reason on a Tuesday. Make them and eat one straight from the freezer at 10pm and feel zero guilt.
Drop a comment below and tell me how yours turned out. Did you do a classic vanilla, or did you get creative with the flavors? I want to know. And if you have questions at any point, ask away — I’m here!