You know those desserts that look like they came straight from a bakery window? This is one of them — except you’re making it at home, and it’s going to be way more satisfying than anything you could buy.
Red velvet and cream cheese frosting are already a perfect pair. But roll them together into a spiral, slice it open, and suddenly you’ve got the most dramatic dessert on any table. 😍
The first time I made this, I genuinely couldn’t believe how gorgeous it turned out. That deep red swirl against the white filling looks so impressive that people always assume it took all day. It didn’t.
And here’s the thing nobody tells you: Swiss rolls have a reputation for being tricky, but this recipe is much more forgiving than you’d think. The key is rolling the cake while it’s still warm. Skip that step and yes, it’ll crack. Follow it and you’ll be fine.
Recipe at a Glance
| Detail | Info |
|---|---|
| Prep Time | 25 minutes |
| Bake Time | 12–14 minutes |
| Chill Time | 1 hour |
| Total Time | ~1 hr 45 min |
| Servings | 10 slices |
| Difficulty | Intermediate |
What You’ll Need
For the Red Velvet Cake
- ¾ cup (95g) all-purpose flour
- 2 tablespoons unsweetened cocoa powder
- 1 teaspoon baking powder
- ¼ teaspoon salt
- 3 large eggs, room temperature
- ¾ cup (150g) granulated white sugar
- 1 teaspoon pure vanilla extract
- 2 tablespoons whole milk
- 1 tablespoon vegetable oil
- 1–2 tablespoons red gel food coloring
- 1 teaspoon white vinegar
- Powdered sugar (for rolling)
For the Cream Cheese Filling
- 8 oz (226g) full-fat cream cheese, softened
- 1½ cups (180g) powdered sugar, sifted
- 1 teaspoon pure vanilla extract
- 1 cup (240ml) heavy whipping cream, cold
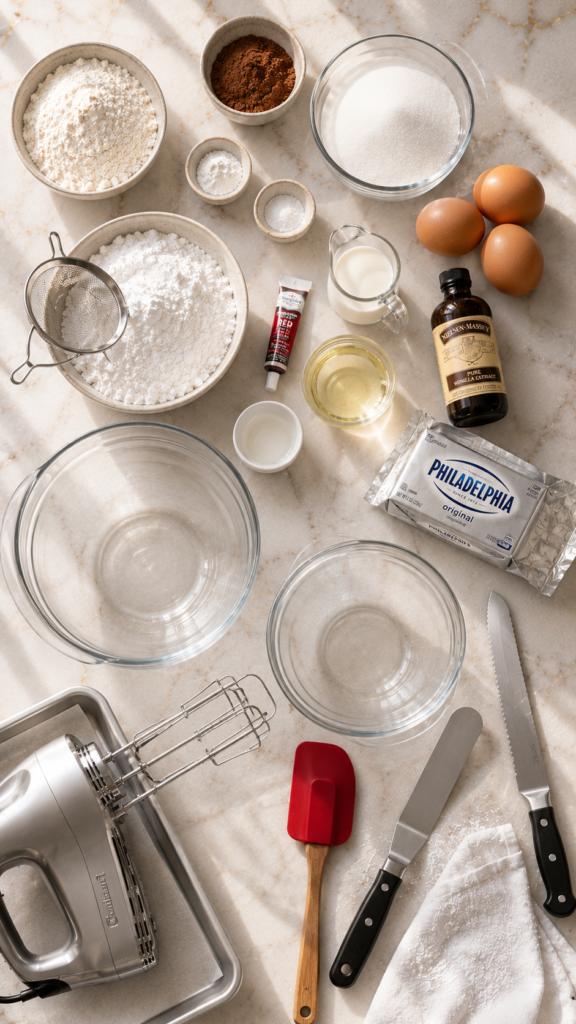
Tools You’ll Need
| Tool | Why You Need It |
|---|---|
| 15×10-inch jelly roll pan | The standard size — a different size changes the thickness and roll-ability |
| Parchment paper | Non-negotiable for easy release |
| Electric hand mixer or stand mixer | You need ribbon-stage eggs — a hand whisk will take forever |
| Two large mixing bowls | One for batter, one for filling |
| Rubber spatula | For folding without deflating the batter |
| Clean lint-free kitchen towel | This is what you roll the hot cake in, dusted with powdered sugar |
| Offset spatula or butter knife | For spreading filling evenly |
| Fine mesh sieve | For dusting the towel and finishing the roll |
| Wire cooling rack | To cool the rolled cake before filling |
| Sharp serrated knife | For clean, impressive slices |
Pro Tips
- Roll it hot, not warm. The moment it comes out of the oven, flip it onto the towel and roll it up immediately. This trains the sponge into that shape. Waiting even 10 minutes makes cracking much more likely.
- Use gel food coloring, not liquid. Liquid adds moisture and requires a lot more to get a deep color. Gel gives you that vivid red with a small amount — usually just 1 tablespoon.
- Don’t skip the vinegar. One teaspoon of white vinegar reacts with the cocoa powder to bring out the red tones. It’s the same science behind why classic red velvet has that distinct color and slight tang.
- Cold cream is everything. The filling only whips properly if your cream is very cold. If your kitchen is warm, put your bowl and beaters in the freezer for 10 minutes first.
- Unroll gently. Small cracks at the edges when you unroll are totally normal. The filling and the final roll will cover them completely — don’t stress it.
How to Make It
1. Prep your pan and towel. Preheat the oven to 375°F (190°C). Line your jelly roll pan with parchment paper and spray lightly with non-stick spray. Lay a clean kitchen towel flat and dust generously with powdered sugar.
2. Whisk the dry ingredients. In a medium bowl, sift together the flour, cocoa powder, baking powder, and salt. Set aside.
3. Beat the eggs and sugar. In a large bowl, beat the eggs and granulated sugar on high speed for 4–5 full minutes until the mixture is thick, pale, and falls off the beaters in a ribbon. Don’t rush this step — it’s what makes the sponge light and flexible.
4. Add the wet ingredients. On low speed, mix in the vanilla extract, vegetable oil, milk, red food coloring, and white vinegar until just combined.
5. Fold in the dry ingredients. Using a rubber spatula, gently fold the flour mixture into the egg mixture. A few streaks are fine — overmixing will deflate the batter and give you a dense cake.
6. Bake. Pour the batter into the prepared pan and spread evenly. Bake for 12–14 minutes until the top springs back when gently pressed.
7. Roll immediately. This is the critical step. The moment the pan comes out of the oven, flip the cake onto the powdered sugar towel. Peel off the parchment paper. Starting from the short end, roll the cake up inside the towel. Place seam-side down on a wire rack and let cool completely — about 1 hour.
8. Make the cream cheese filling. Beat the softened cream cheese until smooth. Mix in the sifted powdered sugar and vanilla. In a separate cold bowl, whip the heavy cream to stiff peaks. Gently fold the whipped cream into the cream cheese mixture in two batches.
9. Fill and re-roll. Carefully unroll the cooled cake. Spread the filling evenly over the surface, leaving a ½-inch border on all edges. Roll the cake back up (without the towel this time), using the towel to help guide it. Wrap tightly in plastic wrap and refrigerate for at least 1 hour.
10. Slice and serve. Unwrap, dust with powdered sugar, and slice with a sharp serrated knife — wiping the blade between cuts gives you those clean, dramatic spirals.
Substitutions and Variations
- No red food coloring? Beet powder works as a natural alternative (2–3 teaspoons). Color will be slightly more muted but still pretty.
- Dairy-free: Swap the cream cheese for dairy-free cream cheese and use full-fat coconut cream (chilled overnight) in place of heavy cream.
- Gluten-free: A 1:1 gluten-free baking flour with xanthan gum works well here.
- Extra depth: Add ½ teaspoon of espresso powder to the dry ingredients. It won’t taste like coffee — it just deepens the chocolate flavor.
- Festive version: Top with fresh raspberries and a dusting of red and white sprinkles for holidays or special occasions.
Make-Ahead Tips
This is genuinely one of the best make-ahead desserts you can have in your rotation.
Bake it, fill it, wrap it up, and refrigerate overnight. The filling firms up beautifully and the flavors settle together in a way that’s even better the next day.
Hold off on the powdered sugar dusting until right before you serve — it absorbs into the surface over time.
You can also freeze the unfilled sponge (rolled in the towel, then wrapped in plastic) for up to one month. Thaw in the fridge overnight, fill, chill for an hour, and serve.
Nutritional Breakdown
Per slice, based on 10 servings
| Nutrient | Per Slice |
|---|---|
| Calories | ~340 kcal |
| Total Fat | 18g |
| Saturated Fat | 10g |
| Carbohydrates | 41g |
| Sugar | 31g |
| Protein | 5g |
| Sodium | 195mg |
Values are approximate and vary by exact ingredients used.
Meal Pairing Suggestions
This pairs best after a lighter meal. A simple roasted chicken, a pasta dish, or a green salad dinner all work great before this kind of rich dessert.
For drinks — strong espresso, Earl Grey tea, or sparkling water with lemon all complement the cream cheese filling really well.
Leftovers and Storage
- Refrigerator: Wrap in plastic wrap or store in an airtight container for up to 4 days. The sponge stays moist surprisingly well.
- Freezer: Slice individually, freeze flat on a parchment-lined tray, then transfer to a zip-lock bag. Good for up to 2 months. Thaw in the fridge.
- Serving from cold: Let slices sit at room temperature for 10–15 minutes before eating. The filling softens slightly and the flavor is so much better than straight from the fridge.
FAQ
Why did my Swiss roll crack? Almost always because it wasn’t rolled while still hot. The sponge loses its flexibility as it cools, so by the time you try to roll it, it snaps. Roll it immediately out of the oven — that’s the single most important step.
Can I use a boxed red velvet cake mix? Standard boxed mixes are too dense and won’t roll without cracking. The egg-forward sponge in this recipe is specifically engineered to be flexible. Stick with the scratch version.
My filling is too soft. What went wrong? The heavy cream wasn’t cold enough, or wasn’t whipped to true stiff peaks. Pop the filling in the fridge for 20–30 minutes and it should firm right up.
Can I make this without a jelly roll pan? The 15×10-inch size really matters here. A larger pan makes the cake too thin; a smaller pan makes it too thick. Both make rolling harder and messier.
How do I get clean slices? Sharp serrated knife, wiped clean between each cut. And make sure the roll has chilled for at least an hour — ideally longer. A fully chilled roll slices like a dream.
Do I really need the white vinegar? Yes. White vinegar reacts with the cocoa powder to enhance the red pigments and gives red velvet that signature subtle tang. It’s not optional — it’s chemistry.
Wrapping Up
If you’ve been putting off making a Swiss roll because it seemed complicated, this is your sign to just go for it. 🎉
The steps are simple, the result is genuinely stunning, and there’s something really satisfying about slicing into that first piece and seeing that perfect red and white spiral staring back at you.
It’s the kind of dessert you make once and it becomes your thing — the one people request at every gathering.
Give it a go and drop a comment below. I’d love to hear how it turned out, and if you run into any questions while you’re in the middle of it, ask away — that’s what the comments section is for. 😊