You’ve probably walked past hundreds of desserts in your life and felt nothing.
And then there’s Napoleon Cake.
One bite and it rewires something in your brain. 😮 Layers upon layers of impossibly crisp pastry, sandwiched together with a cold, silky custard cream that somehow stays light while being completely indulgent.
It’s the kind of cake that makes people go quiet at the table.
And the wild part? This is a Russian classic that’s been around since the 1800s. Some food historians trace it back to the celebration of Napoleon Bonaparte’s defeat in 1812. Others say it was named after the city of Naples. Nobody fully agrees. But everyone agrees it tastes incredible.
Here’s what makes this recipe worth your Saturday afternoon: you don’t need any special skills. Just patience, a rolling pin, and the right technique (all covered below).
Stick around, because there’s a pro tip in this post that completely changes the texture of the final cake. Most people skip it. Don’t be most people.
Recipe at a Glance
| Detail | Info |
|---|---|
| Prep Time | 1.5 hours |
| Chill Time | 8 hours (overnight is best) |
| Cook Time | 45 minutes |
| Total Time | ~10 hours |
| Servings | 12 slices |
| Skill Level | Intermediate |
| Best For | Special occasions, weekend baking |
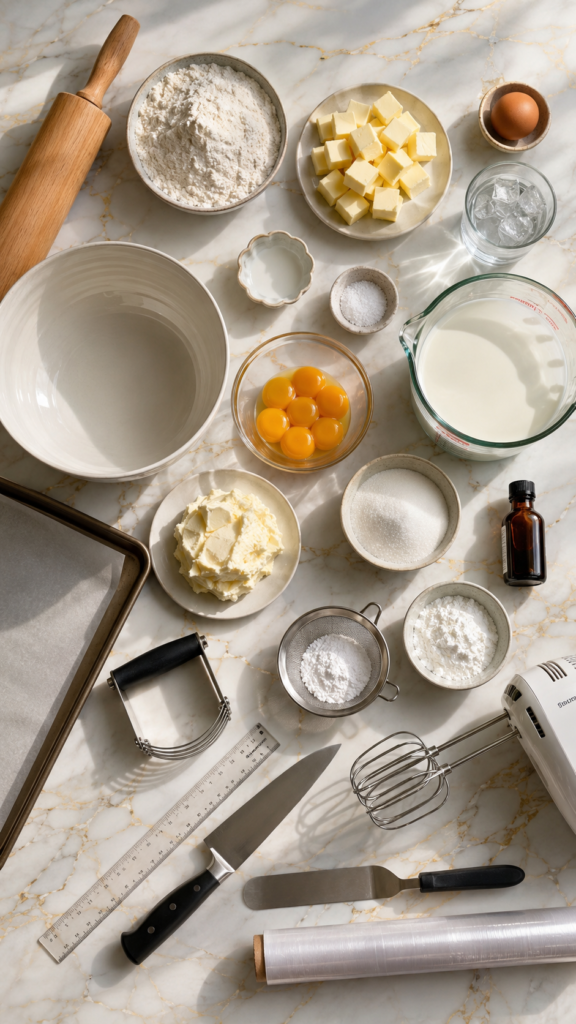
What You’ll Need
For the Pastry Layers
- 3 cups (375g) all-purpose flour, plus more for dusting
- 1 cup (226g) cold unsalted butter, cut into small cubes
- 1 large egg
- ½ cup (120ml) ice-cold water
- 1 tsp white vinegar
- ½ tsp salt
For the Custard Cream (Pastry Cream)
- 4 cups (960ml) whole milk
- 6 large egg yolks
- 1 cup (200g) granulated sugar
- ⅓ cup (40g) cornstarch
- 2 tsp pure vanilla extract
- 1 cup (226g) unsalted butter, softened and cut into pieces
For Finishing
- Reserved crumbled pastry layer (for topping)
- Powdered sugar (for dusting, optional)
Tools You’ll Need
- Large mixing bowl
- Pastry cutter or fork (or food processor)
- Rolling pin
- Ruler or straight edge
- Parchment paper
- 2-3 large baking sheets
- Sharp knife or pizza cutter
- Medium saucepan
- Whisk
- Electric hand mixer or stand mixer
- Cake board or large flat plate
- Offset spatula or regular spatula
- Plastic wrap
Pro Tips
1. Keep everything cold for the pastry. The whole game with Napoleon pastry layers is keeping the butter cold. Cold butter = steam pockets during baking = flaky layers. If your kitchen is warm, pop the dough in the fridge for 20-minute rests between rolling.
2. Roll thin. Seriously, thin. Each layer should be about 1-2mm thick. Thicker layers don’t crisp up the same way, and the cake becomes stodgy instead of light. Use a ruler. No shame in that.
3. The custard must be completely cool before you whip in the butter. If you add softened butter to warm custard, it melts instead of whipping into the cream. The result is a greasy, flat filling instead of a fluffy, cloud-like one. Let the custard chill to room temperature, minimum.
4. The overnight rest is non-negotiable. The cake needs to sit in the fridge for at least 8 hours. This is when the pastry layers absorb just enough moisture from the cream to go from crisp and brittle to tender, melt-in-your-mouth perfection. Cutting it early is the #1 mistake beginners make. ⏰
5. Save your ugliest layer. One layer will inevitably bake unevenly or break apart. Save it. Crush it into crumbs. That’s your topping. Napoleon cake’s signature look is that crumb-dusted top, and it tastes amazing.
How to Make Napoleon Cake
Step 1: Make the Pastry Dough
- In a large bowl, combine flour and salt.
- Add the cold butter cubes and cut into the flour using a pastry cutter or two forks until it resembles coarse crumbs with pea-sized pieces of butter still visible.
- In a small bowl, whisk together the egg, ice water, and white vinegar.
- Pour the wet mixture over the flour mixture. Mix with a fork until just combined — the dough will look shaggy, and that’s exactly right.
- Divide into 10 equal portions. Shape each into a flat disc, wrap in plastic wrap, and refrigerate for at least 30 minutes.
Step 2: Roll and Bake the Layers
- Preheat oven to 400°F (200°C). Line baking sheets with parchment paper.
- On a lightly floured surface, roll one disc of dough into a thin rectangle or circle, roughly 9×13 inches.
- Transfer to the baking sheet. Prick all over with a fork (this prevents puffing).
- Bake for 10-12 minutes until golden brown and crisp.
- While it’s still warm, trim to a consistent shape using your knife or pizza cutter. Save the trimmings in a bowl.
- Repeat with remaining dough portions, working in batches.
- Let all layers cool completely on a wire rack.
- Take your ugliest or most broken layer, crumble it together with all the trimmings, and set aside for the topping.
Step 3: Make the Custard Cream
- In a medium saucepan, heat the milk over medium heat until it just begins to steam (do not boil).
- In a bowl, whisk together egg yolks, sugar, and cornstarch until pale and smooth.
- Slowly pour half the hot milk into the egg mixture, whisking constantly.
- Pour everything back into the saucepan. Cook over medium heat, stirring constantly with a whisk, until the custard thickens and large bubbles begin to pop on the surface (about 3-4 minutes).
- Remove from heat. Stir in vanilla extract.
- Press plastic wrap directly on the surface of the custard to prevent a skin from forming.
- Let it cool completely to room temperature (about 1.5-2 hours), then refrigerate until cold.
Step 4: Whip the Custard
- Transfer the cold custard to a mixing bowl.
- Using an electric hand mixer or stand mixer, beat on medium speed.
- Add the softened butter, a few pieces at a time, beating well after each addition.
- Beat until the cream is light, fluffy, and noticeably paler in color (about 3-4 minutes total). This step is the secret to that airy, luxurious texture. 🌟
Step 5: Assemble
- Place one pastry layer on your cake board or serving plate.
- Spread a generous layer of cream evenly using an offset spatula (about 3-4 tablespoons per layer).
- Place the next pastry layer on top, pressing down gently.
- Repeat until all layers and cream are used, finishing with a layer of cream on top and on the sides.
- Press the reserved crumbs gently all over the top and sides of the cake.
- Cover loosely with plastic wrap and refrigerate for a minimum of 8 hours, preferably overnight.
Substitutions and Variations
| Swap | Details |
|---|---|
| All-purpose flour | Bread flour works but creates a slightly chewier layer |
| Whole milk | 2% milk is fine; avoid skim |
| Butter in cream | Can use heavy whipping cream (whipped separately) for a lighter version |
| Vanilla extract | Vanilla bean paste gives an even richer flavor |
| Classic shape | Can be assembled as individual round cakes instead |
Flavor variations to try:
- Add 2 tbsp cocoa powder to every other pastry layer for a chocolate-swirled version
- Stir fresh lemon zest into the custard cream for a citrus Napoleon
- Add a thin layer of raspberry jam between every second cream layer
Make-Ahead Tips
Napoleon Cake is actually better when made ahead. The flavors deepen and the textures come together beautifully after 12-24 hours in the fridge.
- Pastry layers: Can be baked up to 2 days in advance. Store in an airtight container at room temperature.
- Custard cream: Can be made 1 day ahead. Keep tightly wrapped in the fridge.
- Fully assembled cake: Assemble the day before serving. The overnight chill is part of the recipe.
Nutritional Breakdown (Per Slice, Approx. 12 Servings)
| Nutrient | Amount |
|---|---|
| Calories | ~520 kcal |
| Total Fat | 31g |
| Saturated Fat | 19g |
| Carbohydrates | 54g |
| Sugar | 28g |
| Protein | 7g |
Note: These are estimates based on standard ingredient amounts.
Diet swaps:
- Gluten-free: Use a 1:1 GF flour blend (results will be slightly less flaky)
- Dairy-free: Substitute plant-based butter and oat milk (texture will differ)
Meal pairing: Serve Napoleon Cake with a strong black coffee or an unsweetened black tea. The slight bitterness cuts through the richness perfectly.
Leftovers and Storage
- Refrigerator: Store covered for up to 4 days. The layers will continue softening over time, which many people prefer.
- Freezer: Napoleon Cake can be frozen whole (before adding the crumb topping) for up to 1 month. Wrap tightly in plastic and foil. Thaw overnight in the fridge before adding the crumb coating and serving.
- Do not leave at room temperature for more than 2 hours — it contains a custard cream that needs refrigeration.
FAQ
Can I use puff pastry from the store instead?
You can, but it’s not really a Napoleon Cake at that point. Store-bought puff pastry is a completely different dough — much thicker and butterier. The result will taste more like a French mille-feuille. Still delicious, but different.
My cream split and looks greasy. What happened?
The custard was probably still too warm when you added the butter. If this happens, try gently warming the whole mixture over a double boiler while stirring, then re-chipping it again in the mixer once it’s smooth.
Can I make this with fewer layers?
You can reduce to 8 layers, but 10 is the classic. The ratio of pastry to cream is carefully balanced, and fewer layers can make it feel heavier.
My layers puffed up during baking even though I pricked them. Help!
Dock more aggressively with the fork — go at ½-inch intervals all over. You can also place another sheet of parchment and a second baking sheet directly on top while baking for the first 5 minutes.
How do I cut it neatly?
A sharp, thin-bladed knife and a slow, gentle sawing motion. Don’t press down — the layers will crumble. Clean the knife between cuts for clean slices.
Can kids make this?
The rolling and layering are great kid-friendly tasks. The custard cooking step requires careful attention near the stove, so keep that for the adults.
Wrapping Up
Napoleon Cake isn’t just a dessert. It’s a statement.
Ten crisp, golden layers held together by a cream so light and silky, you’ll be thinking about it for days.
And you made it. From scratch. 🙌
The first time is always the one that surprises you the most. You’ll pull that crumbled-crumb-topped cake out of the fridge after a full night of resting, cut that first slice, and feel genuinely proud.
Give this recipe a try this weekend. Then come back and drop a comment below telling me how it went. Did the cream turn out fluffy? Did you go the lemon variation route? Did someone at the table go back for a third slice?
I want to hear all of it.