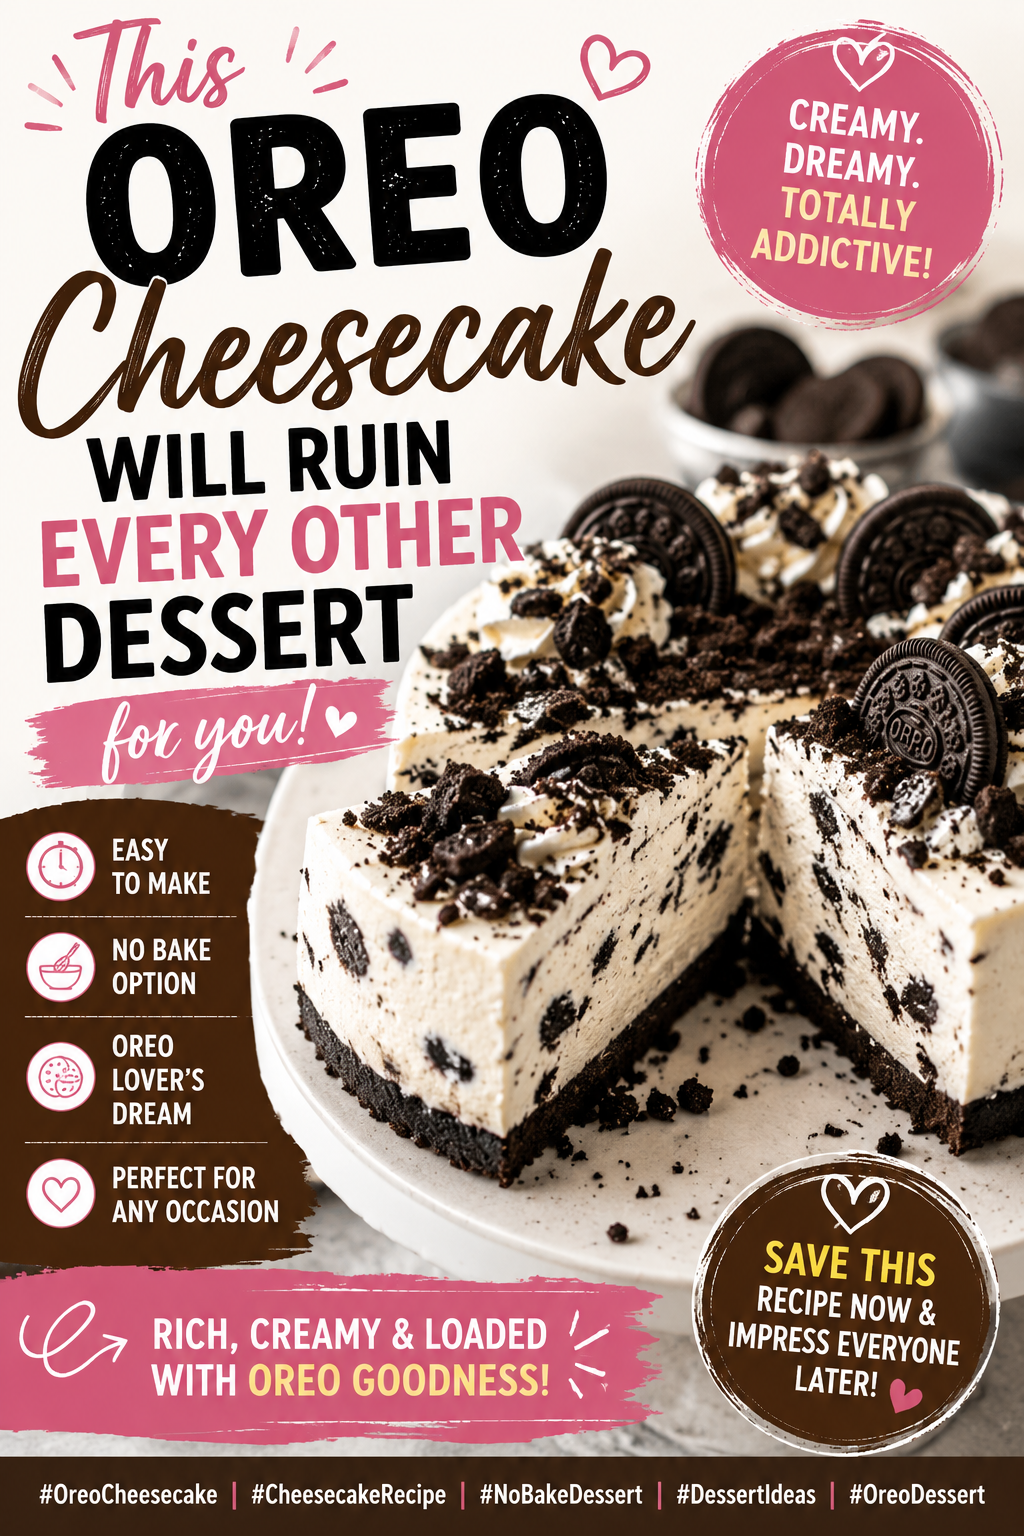
You know that feeling when you take one bite of something and suddenly everything else tastes boring?
That’s this Oreo cheesecake.
It’s got a thick, buttery Oreo crust, a rich and ultra-creamy cheesecake filling that barely wobbles when you pull it from the oven, and a ganache-like topping that makes it look like it came straight from a bakery case.
And the kicker? You don’t need to be a pastry chef. You just need a few hours, a springform pan, and maybe a little patience. (Okay, a lot of patience for the chilling part. More on that later.)
Recipe at a Glance
| Detail | Info |
|---|---|
| Prep Time | 30 minutes |
| Cook Time | 55 to 60 minutes |
| Chill Time | At least 6 hours (overnight preferred) |
| Total Time | ~7 to 8 hours |
| Servings | 12 slices |
| Difficulty | Beginner-Friendly |
| Best For | Birthdays, dinner parties, or a random Tuesday |
What You’ll Need
For the Crust
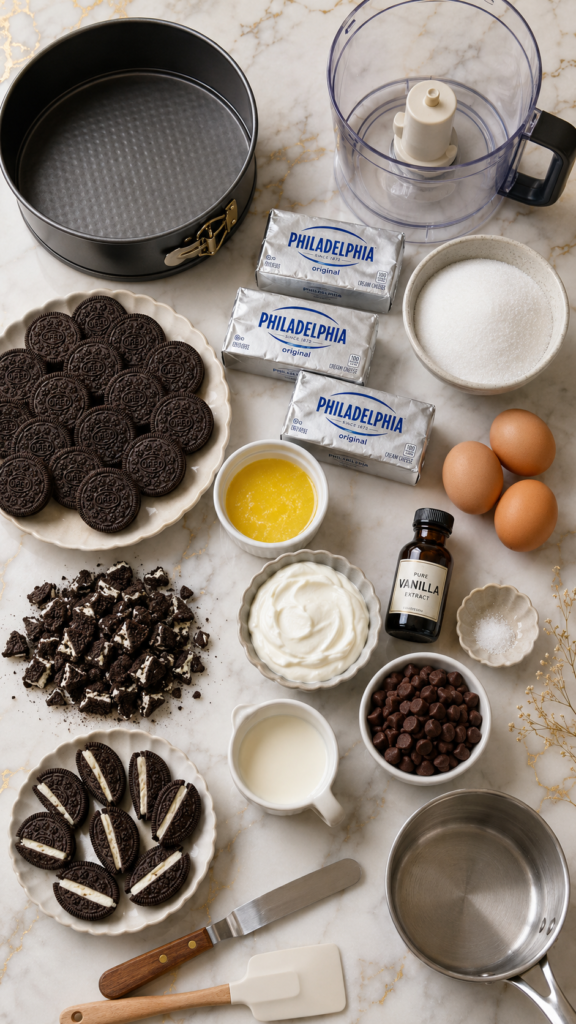
- 24 Oreo cookies (whole, with filling — don’t remove it)
- 5 tablespoons unsalted butter, melted
For the Cheesecake Filling
- 24 oz (3 blocks) full-fat cream cheese, softened to room temperature
- 1 cup granulated sugar
- 3 large eggs, at room temperature
- 1 cup full-fat sour cream
- 1 teaspoon pure vanilla extract
- 1/4 teaspoon fine salt
- 14 Oreo cookies, roughly chopped (for mixing into the filling)
For the Topping
- 1/2 cup heavy cream
- 4 oz semi-sweet chocolate chips (or chopped chocolate)
- 8 to 10 Oreo cookies, halved or crushed (for garnish)
Tools You’ll Need
- 9-inch springform pan
- Food processor or zip-lock bag + rolling pin
- Stand mixer or hand mixer
- Large mixing bowl
- Rubber spatula
- Roasting pan or large baking dish (for the water bath)
- Aluminum foil
- Small saucepan
- Cooling rack
- Offset spatula (optional but helpful)
Pro Tips
Here’s what took me a few batches to figure out, so you don’t have to:
- Room temperature ingredients are non-negotiable. Cold cream cheese leads to lumpy filling. Take everything out of the fridge at least an hour before you start. Yes, an hour. Set an alarm if you have to.
- Don’t skip the water bath. I know it sounds fussy, but it’s the thing that keeps your cheesecake creamy instead of dry and cracked. Wrap the springform pan in two layers of foil so water doesn’t sneak in.
- Stop the mixer as soon as the eggs are incorporated. Overmixing after adding eggs whips in too much air and that’s what causes those dramatic cracks on top. Low and slow once the eggs go in.
- Turn the oven off and leave the door cracked. When the cheesecake is done, resist the urge to yank it out. Let it sit in the cooling oven for an hour. This gradual temperature change is a game-changer for texture.
- Chill it overnight if you can. Six hours is the minimum, but overnight? That’s when it hits peak cheesecake. The flavor deepens, the texture sets perfectly, and slicing becomes so much cleaner.
Substitutions and Variations
Don’t have something on hand, or want to remix it a little? Here are some easy swaps:
Crust
- Swap regular Oreos for Golden Oreos for a vanilla-flavored crust
- Use gluten-free chocolate sandwich cookies for a GF version
Filling
- Replace sour cream with full-fat Greek yogurt (same tang, slightly lighter)
- No vanilla extract? A tiny pinch of almond extract adds an interesting depth
- For a lighter texture, use Neufchâtel cheese instead of full-fat cream cheese (it’ll be slightly less rich but still delicious)
Topping
- Skip the chocolate ganache and go with whipped cream + crushed Oreos instead
- Add a caramel drizzle over the ganache for a salted caramel Oreo version
- Swap the chocolate chips for white chocolate chips for a completely different topping vibe
Make-Ahead Tips
This cheesecake is built for making ahead, which honestly makes it one of the best desserts to bring to a gathering.
- Make it 1 to 2 days ahead. It keeps beautifully in the fridge, covered, for up to 4 days.
- Wait to add the ganache topping and Oreo garnish until the day you plan to serve it. The ganache can soften the cookies over time.
- If you want to freeze it, wrap individual slices tightly in plastic wrap and then foil. They’ll keep for up to 2 months. Thaw overnight in the fridge.
Nutritional Breakdown (Per Slice, Approx.)
| Nutrient | Amount |
|---|---|
| Calories | ~520 |
| Fat | 34g |
| Saturated Fat | 19g |
| Carbohydrates | 46g |
| Sugar | 34g |
| Protein | 7g |
| Sodium | 310mg |
Based on 12 servings. Values will vary depending on specific brands used.
Meal Pairing Suggestions
Serving this at a dinner party? Here’s what pairs really well:
- A light pasta dish as the main (so the cheesecake gets the spotlight it deserves)
- A hot espresso or coffee on the side
- Fresh strawberries or raspberries on the plate to cut through the richness
- A scoop of vanilla bean ice cream if you’re feeling extra
How to Make This Oreo Cheesecake
Step 1: Make the Crust
Preheat your oven to 325°F (163°C).
Pulse the 24 Oreos in a food processor until they become fine crumbs. No food processor? Toss them in a zip-lock bag and crush them with a rolling pin. It’s also a great stress reliever.
Mix the crumbs with melted butter until everything looks like wet sand. Press the mixture firmly and evenly into the bottom of a 9-inch springform pan. Use the bottom of a measuring cup to pack it down really well. You want it solid, not crumbly.
Bake the crust for 10 minutes, then set it aside to cool.
Step 2: Prepare the Filling
In a large bowl, beat the softened cream cheese on medium speed until it’s completely smooth and fluffy — about 2 minutes. Scrape down the sides of the bowl often.
Add the sugar and beat again until combined. Add the sour cream, vanilla, and salt, and mix until smooth.
Add the eggs one at a time, mixing on low speed after each addition. Mix just until the yolk disappears. That’s the signal to stop.
Fold in the roughly chopped Oreos with a rubber spatula.
Step 3: Set Up the Water Bath
Wrap the outside of your springform pan tightly in two layers of heavy-duty aluminum foil. This keeps water out.
Pour the cheesecake filling over the cooled crust and smooth the top with an offset spatula.
Place the foil-wrapped pan inside a larger roasting pan. Fill the roasting pan with about an inch of hot water.
Step 4: Bake
Bake at 325°F for 55 to 60 minutes. The edges should look set, but the center should still have a slight jiggle — like Jell-O, not like liquid.
Turn off the oven and leave the door cracked open about an inch. Let the cheesecake sit inside for 1 hour. This is not optional. ⏰
After that hour, remove the cheesecake from the water bath, peel off the foil, and let it cool completely on a wire rack (another hour or so).
Once it’s at room temperature, cover it loosely and refrigerate for at least 6 hours.
Step 5: Make the Ganache Topping
Heat the heavy cream in a small saucepan over medium heat until it just starts to simmer. Don’t let it boil.
Pour it over the chocolate chips in a bowl. Let it sit for 2 minutes, then stir until smooth and glossy.
Let the ganache cool for about 10 minutes so it thickens slightly, then pour it over the chilled cheesecake.
Arrange the halved or crushed Oreos on top however you like. There’s no wrong way here.
Return the cheesecake to the fridge for at least 30 minutes for the ganache to set.
Step 6: Slice and Serve
Run a sharp knife under hot water, wipe it dry, and slice. Repeat between cuts for clean, bakery-worthy slices.
Leftovers and Storage
- Fridge: Covered tightly, the cheesecake keeps for up to 4 days. The flavor actually gets better on day two.
- Freezer: Wrap individual slices in plastic wrap, then foil. Freeze for up to 2 months. Thaw in the fridge overnight.
- Don’t freeze the whole cheesecake if you’ve already added the ganache and Oreo topping — the cookies will get soggy. Freeze before decorating.
FAQ
Can I make this without a water bath?
You can, but there’s a real chance the top will crack. It’ll still taste amazing, but the texture may be a little denser and drier around the edges. If you skip the water bath, reduce the oven temperature to 300°F and bake for 70 minutes.
My cheesecake cracked. What happened?
Usually this comes down to overmixing the eggs, baking at too high a temperature, or pulling it out of the oven too quickly. The cracks won’t affect the taste at all — just cover them with the ganache and nobody will ever know. 😉
Can I use low-fat cream cheese?
Technically yes, but the texture will be noticeably lighter and less creamy. For a special occasion cheesecake, full-fat is worth it every single time.
Why does my cheesecake sink in the middle?
A slight dip is normal and totally fine. A major collapse usually means it was underbaked or cooled too fast. The ganache will cover a multitude of sins here.
How do I know when it’s done baking?
The edges will look matte and set, but the center (about a 2-inch circle) should jiggle slightly when you gently shake the pan. If the whole thing jiggles like liquid, it needs more time.
Can I use Oreo thins?
For the crust, yes — though you’ll need more of them since they’re thinner. For the filling garnish, regular Oreos hold up better.
Do I have to remove the cream from the Oreos for the crust?
No! Leave the filling in. It adds flavor and helps the crust hold together better.
Wrapping Up
If you’ve been looking for a dessert that makes people stop mid-bite and say “okay, what is this” — this is it.
The Oreo crust is buttery and satisfying. The filling is dense but creamy in a way that feels almost indulgent. The ganache pulls it all together.
It’s the kind of recipe that looks like you really went for it, but once you know the steps, it’s honestly very manageable. Even for a first-time cheesecake baker.
Give it a go and come back and leave a comment below! I’d love to hear how it turned out, what variations you tried, or any questions that came up along the way.